
To design a product label, start with the real size of your container, rank the information (brand, product name, one key detail, then required text), build the file with bleed and a safe zone, and export a 300 DPI CMYK print PDF. Below is the full process, plus the print specs that stop labels from coming back with cut-off text or blurry images.
Step 1: Know the size and the surface
Measure your container before you open any design tool. The label has to fit the flat area where it will sit, and bottles, jars, tubes and pouches all behave differently. Ask your printer for a template or dieline if you use a custom shape. Our team designs on the dieline your printer supplies, so get that file first.
Step 2: Decide what goes on the label
Most labels need these parts, though the exact list depends on your product and market:
- Brand name or logo
- Product name and a short descriptor or flavor
- Key claim or benefit (keep it to one)
- Required information: ingredients, usage, warnings, net quantity, company details
- Barcode or QR code if you sell in stores or online
Some of this is regulated. Food, supplements, cosmetics and household chemicals each have their own rules, so check the regulator and your retailer’s requirements before you finalize the text.
Step 3: Build a clear hierarchy
Shoppers see your label from a distance first. A simple order works on almost every product: brand, then product name, then one supporting detail, then the required text. If those four fight each other, extra colors will not fix it.
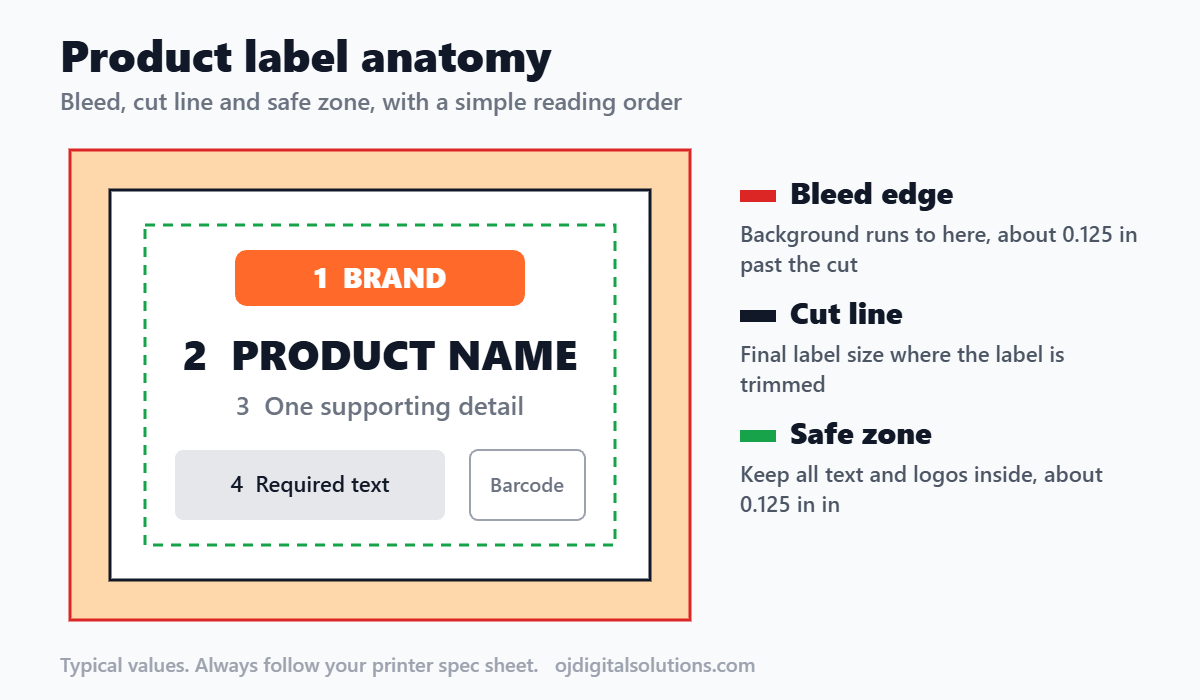
Step 4: Set up bleed and a safe zone
Cutting is never perfect. Bleed and a safe zone protect your design from that.
| Term | What it means | Typical spec |
|---|---|---|
| Trim or cut line | Where the label is cut | Your finished size |
| Bleed | Background that extends past the cut line | About 0.125 in (2 to 3 mm) outside |
| Safe zone | Area where text and logos must stay | About 0.125 in inside the cut line |
Printers differ, and some use smaller margins. Treat these numbers as common starting points and follow your printer’s spec sheet.
Step 5: Use print-ready settings
- Resolution: at least 300 DPI at the final size. Web images at 72 DPI look soft in print.
- Color: design in CMYK. Use a Pantone color only if your printer offers spot colors and your brand needs an exact match.
- Fonts: keep body text readable, and many printers advise at least 6 pt as an absolute minimum. Convert text to outlines or embed fonts.
- Vector artwork: keep logos and shapes as vectors so they stay sharp.
- File type: export a high-resolution PDF unless your printer asks for something else.
Step 6: Pick the material and proof it
Match the label stock to where the product lives. A bottle that gets wet needs a water-resistant film, while a dry good can use paper. Ask for a proof on the real stock before the full run, because colors and sizes look different on paper than on a screen.
Common label design mistakes
- Text too close to the edge, so it gets cut off
- No bleed, which leaves white slivers at the edges
- Low-resolution images that print blurry
- Too many fonts and competing messages
- Low contrast, such as light text on a pale background
- Skipping the required legal text until the end
DIY or hire a designer?
A simple one-product label can work in a template tool if you set the exact size and export a print PDF. If you have a range of products, need regulated text laid out cleanly or sell on Amazon, a designer saves reprints. See what packaging and label design costs and our FBA packaging requirements. For done-for-you label and packaging artwork, see our design services.
Frequently asked questions
What size should a product label be?
Measure the flat area of your container where the label will sit, then leave a small gap around the edges. Your printer can also give you a template for standard sizes.
How much bleed does a label need?
Many printers ask for about 0.125 inch (roughly 2 to 3 mm) of bleed past the cut line. Always check your own printer’s spec sheet.
What resolution should label artwork be?
Images should be at least 300 DPI at the final printed size. Logos and text are best kept as vector artwork.
Should I design labels in CMYK or RGB?
Use CMYK for print, since most label printing runs on CMYK inks. RGB files can shift in color when converted.
What information must be on a product label?
It depends on the product, the country and the sales channel. Food, supplements and cosmetics have specific rules, so check the regulator or your retailer’s requirements before you print.
Can I design a label in Canva?
Yes, for simple labels, as long as you set the exact size, add bleed and export a high-quality print PDF. Complex projects usually go better with a professional designer.
Bottom line
Good labels come from planning, not decoration. Know your size, rank your information, protect it with bleed and a safe zone, and send your printer a clean 300 DPI CMYK file. Then proof it before you print the full run.