Learning how to print labels from Excel is a great way to maximize productivity by printing per batch instead of individually.
Excel lets you print address labels through different processes. Although you can use third-party software for this, we recommend sticking to the software itself.
I’ll discuss the two most common methods of printing labels: with and without Microsoft Word.
In this guide, you’ll learn the following.
How to create mailing labels in Excel
How to use the Mail Merge function to import your mailing address list from Excel
How to print documents from Excel and Word
I’ll teach you everything you need about creating and printing an address label.
Let’s start.
How To Print Labels From Excel Without Using a Word Document
Although you only need an Excel spreadsheet for this option, you can only print limited data on your address labels.
Follow my instructions to print address labels from Excel. I’ll also include the steps to create labels in Excel without Word.
1 – Create an Excel Address List.
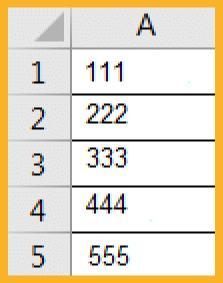
Open a new Excel Spreadsheet. Insert data in each cell.
Hold CTRL+E to get an Excel macro and input the number of columns you want.
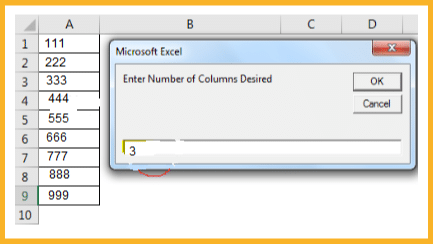
You should see the data displayed like this.
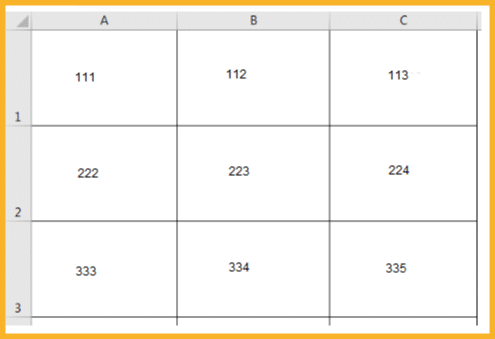
After that, set custom margins for your address labels to ensure they are proportionate. For example, set your top=0.5, bottom=0.5, left=0.21975, and right=0.21975.
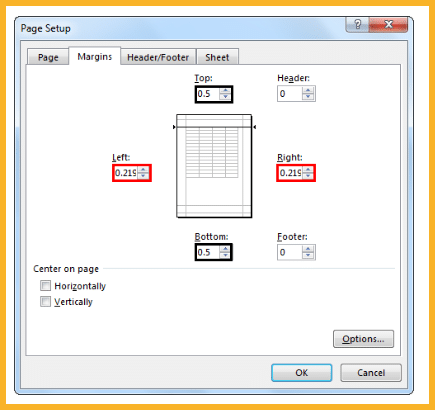
2 – Print Your Labels in Excel.
On your Print Settings, set your scaling option to Fit all columns on one page.
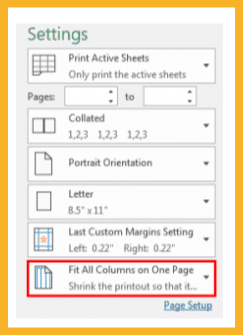
You can now click on Print to get your address labels from Excel without using Word.
How To Print Labels From My Excel Worksheet With a Word Document
If you want more details on your address labels, you need to use a Word document. We advise this process for those that want to print labels from Excel with multi-line data.
We’ll use the mail merge wizard to print your address labels from your Excel worksheet.
Follow the steps below.
1 – Create an Excel Address List.
Arrange your data into rows and columns. Each row comprises all the recipient information on one label. The first row serves as column headers, containing the information you want in your printed labels.
For this example, we’ll use the following data points as column headings:
Customer ID
Title
First Name
Last Name
Date of birth
Address
City
State
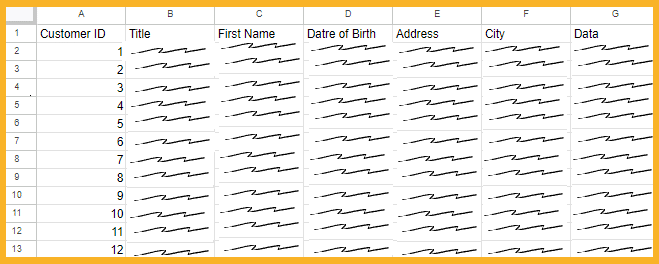
Then, select all cells you want to print from cell A1 to H13. Click on the Formulas tab in between Page Layout and Data.
Choose the button that says Define Name.

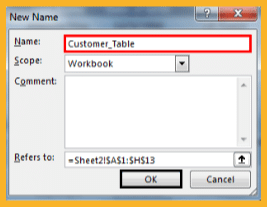
After that, you’ll see this box. Input a name and click on OK.
2 – Open a Blank Word Document.
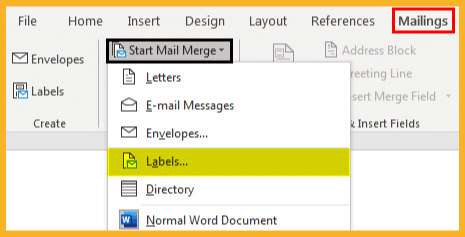
Once open, navigate to the Mailings tab, and click on the Start Mail Merge. Select Labels from the dropdown menu.
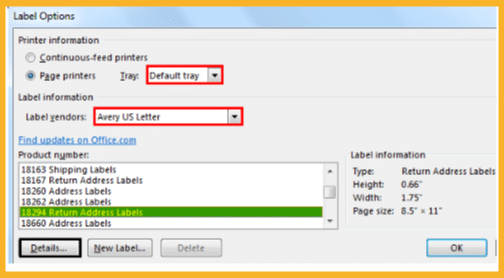
You’ll see the Label Options dialog box pop up where you can adjust the Default tray and Label vendors.
Once you see your Product Number options, you can click on Details.
You can now make adjustments to your labels based on width, height, top margin, side margin, page size, and more.

After adjusting the sizes, click on OK, and your page should have this symbol.

3 – Merge Your Excel Worksheet with Your Word Document.
In the Mailings pane, choose Select Recipients then Use an Existing List.
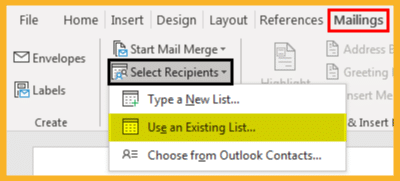
The Select Data Source popup box will appear. Look for your Excel data file and click Open.
After that, you’ll get a Select Table box. Choose your Excel source file with the data you want to print.
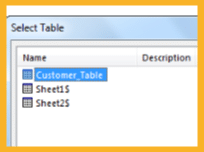
Once you’ve selected the file, click OK.
4 – Add Mail Merge Fields via Address Block.
Now you need to tell Word which information you want to include from Excel. Start by going to Address Block under Mailings.
A dialog box will appear. Select the Match Fields button.
Each merge field should match the corresponding column headers in your Excel file. Review the fields to see if they match, then click OK.
In the next window, click OK again.
If you want to add table styles, add borders through the Design tab. You can make it look like this.
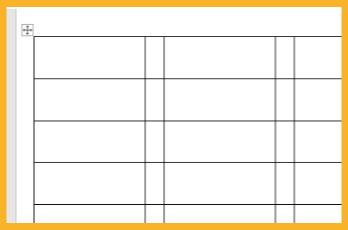
Once you’re done, click the Update Labels option to ensure all remaining tables get the same format. It should look something like this.
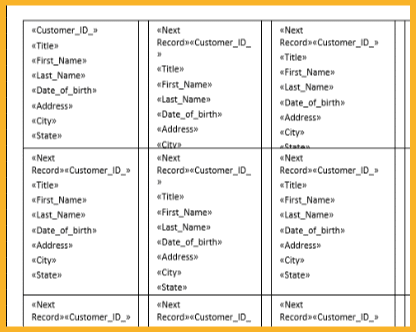
When finished, navigate to your Mailings tab, go to Finish & Merge, and open it. Select Edit Individual Documents.
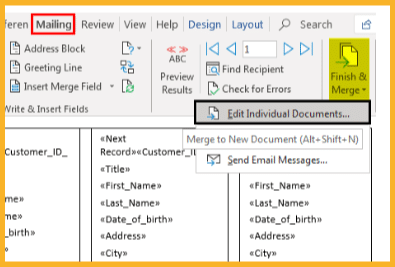
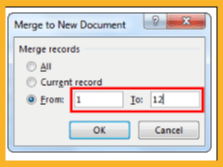
You’ll get a Merge to New Document box. Select All or input the numbers (rows) of the Excel sheet.
After that, your table should look like this.

5 – Print the Merged Labels.
After you click Finish & Merge, a new document should appear containing your newly merged labels.
Double-check the rows and columns to ensure you followed the steps correctly.
Once you’re ready to print, go to File then click Print. You can choose to print all the labels or choose only one page to get a sample print.
How To Maximize the Mail Merge Function
The mail merge tool lets you connect your Excel to Word and vice-versa. It’s a great way to create labels in bulk instead of manually editing each one.
You can add to your existing list and toggle label options if you want to use the same document. However, you can create a new document instead of adding to the same document when printing a new batch.
Importing data from Excel to Word takes some work. I suggest using the mail merge feature only for bulk labels, not for one or two labels.
Here are some instances where I recommend using the mail merge method.
1 – When You’re Printing Over Five Labels
We recommend using the mail merge feature for bulk printing. If you have fewer than five labels, it’s easier just to adjust each label individually.
In this case, we recommend creating a blank document on Word and creating a table. You can adjust the cells as your labels and cut them out after you’ve printed them. You can also go to an Excel sheet and input all the information within a single cell.
However, it’s harder to adjust your label’s size and proportions if you create address labels on an Excel sheet.
2 – If Your Labels Have More Than One Column
For single data labels, there’s no need to use the mail merge method to merge your address list from Excel to MS Word.
You can also adjust the information inside the cell itself by inputting your data in this box and creating a new paragraph within the cell itself.

However, this isn’t effective if your address block gets cramped and you must add more label data inside the cell.
Always preview what the outcome looks like before you create labels.
3 – If You’re Only Printing Price Labels
You can use the mail merge for more complicated labels, but if you only need to print prices, you can print directly from Excel.
If all labels have the same price, copy and paste the contents to as many tables as possible.
After that, look at the final output and see how big the labels are. Excel automatically prints the additional boxes on the next paper if it exceeds the size of the first paper.
4 – If You Don’t Have a Microsoft Product Activation Code
If you don’t have a product key for Microsoft Excel or Word, mail merge won’t work.
In this case, you can learn how to print labels from Google Sheets.
Things To Remember When Creating Mailing Labels
Before you start mail merge from Excel to Word, always remember these things to help create a smooth mail merge process and avoid errors.
Save Labels and Create Templates.
If you use repetitive labels, always save them for later.You can also save linked template documents for Excel and Word. Next time, you need only to update your data. If you want to do this, always save a separate template from the one with your official label information and address list.
Note: you need to edit the template if you want to use a new address list. Even if you copy-paste the template, you still need to mail merge fields from both documents again.
Check Your Columns.
If you mess up one row, this means you mess up one label. However, if you mess up one column, that’ll affect all labels.Always double-check that your columns have the correct information, especially for labels with multiple lines. When in doubt, you can view your output to see if the labels include the correct information.
It also helps to print a smaller test batch before you print the whole list.
Double-Check Columns On Word.
If you want to update labels, ensure you change all of them and not just the first one.
Ensure all columns you want are on your Word document.You can double-check the list of columns on your Word document to no information is missing.

Additional Information on How to Print Labels in Excel
Aside from learning how to create labels from Excel, you might want also to learn the following.
What Is the Microsoft Word Mail Merge Wizard?
The Step-by-Step Mail Merge Wizard feature provides an easier way to create labels in Word. The process usually looks like this.
Open a blank Word document.
In the Mailings pane, select Start Mail Merge then Step-by-Step Mail Merge Wizard.
Choose Labels, then Next: Starting Document.
You can choose to start using a template or an existing and current document.
If you have a compatible template, choose Change document layout.
If you choose an existing document, the wizard will prompt you to choose one. Then, you must select your current document and proceed to the next step.
Next, choose Select Recipients. You can create a new mailing address list or use an existing list.
You can also choose Edit recipient list to open the Mail Merge Recipients dialog box.
The next steps are pretty much the same. You add merge fields and then complete the merge.
What Is an Excel Label Template?
A label template is a format you can choose for your label. It has automatic margins and sizes, which you can still customize as needed.
How Do I Set the Excel Print Area?
When you print an Excel document, the final output always adjusts to how many cells you use. To set the area, view your document and make adjustments for it to fit. You can also adjust the text size or paper size.
How Do I Print Excel Labels on Mac?
My guide on how to print mailing labels from Excel also applies to the app’s Mac version. The same goes for my instructions on how to mail merge labels from Excel to Word.
Can You Use a Regular Printer to Print Labels?
Yes. However, you’ll need to cut pages or make manual adjustments after you print your labels.
Frequently Asked Questions
How Can I Make an Excel Avery Name Tag?
You need to use mail merge in Microsoft Word to choose different types of label brands and product numbers. From there, choose your preferred Avery label template.
How Can I Make Avery Labels in Word?
To make an Avery label from scratch without using Excel, follow these steps.
Open a Word document.
Go to the Mailings tab.
Click on the Labels button.
Select the Envelopes and Labels box and click Labels.
Choose the Options button and place the Avery label product number from your Label vendors dropdown list.
Click Ok.
Can I Print Avery Labels From Excel?
You can use the Mail Merge feature to convert your recipient information in Excel to an Avery label in Word. Follow our steps on how to print labels from Excel in Word, and make sure to choose Avery labels when you’re in the Label Options window.
How Can I Create and Print Avery 5160 Labels from Excel?
Follow the same procedure above, then select 5160 Easy Peel Address Labels from your Product number list. If you need to know the label size, it’s 1″ x 2-5/8″.
How Do I Set the Print Label Format in Excel?
Go to the Page Layout tab and click on Size under Page Setup. Select More Paper Sizes and adjust the width and height for your new format. Once you’re finished, click Ok.
How Can I Print Labels from a CSV File?
First, import your CSV file to Excel. Then follow the above steps on how to print labels from Excel spreadsheet.
How Do I Use Preset Formats in Excel?
Right-click the cells you want to change and select Format Cells from the context menu. After that, choose a category and preset format then click Ok.
How Can I Change the Canva Address Labels Into Print Format?
First, ensure proper spacing and alignment, then export the design as an image or PDF and open the exported file in Word or any dedicated printing software. Set up the page layout and print your label sheet based on your specifications.
How Do You Print Nametags From Excel?
Place the needed information of individual nametag entries inside one cell. After that, edit all needed cells and Print.
How Do You Preview Your Labels Before Printing?
You can open the Label Options window and click Preview Results to see the final output before you print.
The Bottom Line
I hope my guide on how to print address labels from Excel with or without Word is useful. Now, you also know how to make mailing labels from Excel.
Learning how to print labels using either method can simplify your mailing process. It may take some getting used to, but mastering the steps will make the process easier.
If you’re going to ship packages, learning how to create and print shipping labels is your next step.

