If you’re an Amazon seller, then you know that signing up for the Fulfillment by Amazon (FBA) program is a great way to increase your conversion rates and sales.
Items sold through the FBA program are stored and shipped by Amazon, and the ecommerce platform takes care of all of the customer service and returns for you as well.
This is a huge relief for business owners who don’t have time to deal with these issues themselves.
But for many new sellers, the question remains – how do you actually get your products to the Amazon warehouse in the first place?
In this article, I will walk you through the process of how to ship to Amazon FBA warehouse and what you need to do in order to get started.
I’ll also provide a few tips on how to make the process easier for you.
So, let’s get started!
What is Fulfillment by Amazon (FBA)?
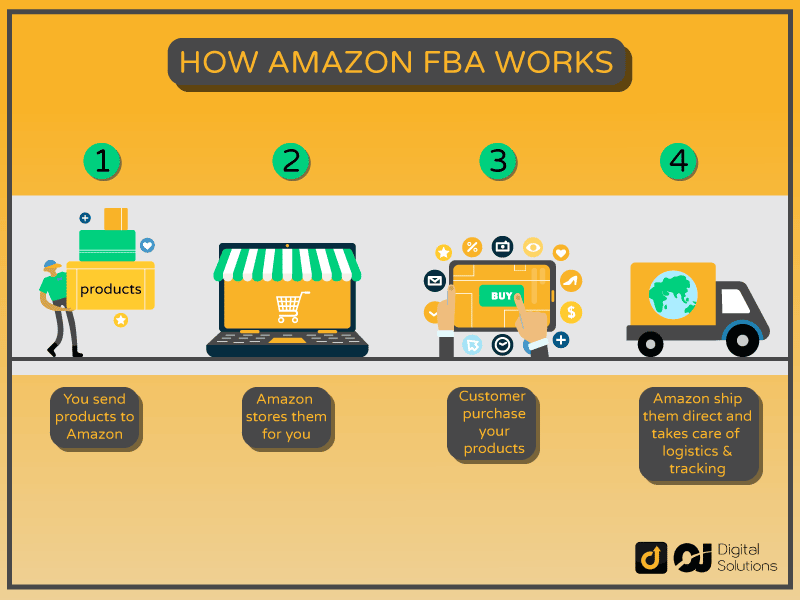
Fulfillment by Amazon (FBA) is a service that lets sellers store their products in Amazon’s fulfillment centers.
The company will then manage inventory and handle shipping the products to customers on the seller’s behalf.
This can be a great way to outsource your shipping and logistics needs.
All you have to do is to send your products to Amazon’s fulfillment centers, then you can focus on other aspects of your business.
The program has become more popular in recent years, and for good reason.
FBA can save you a ton of time and money on fulfillment.
Plus, customers love the Prime shipping that comes with Fulfillment by Amazon orders.
How Much Does Amazon FBA Cost?
The fact is, there are a lot of factors that go into the cost of Amazon FBA.
You need to first understand the different costs that come with selling on Amazon.
The cost of selling on Amazon will be based on your selling plan, fulfillment strategy, product category, and other factors.
These all play a role in how much you’ll ultimately pay to use Amazon FBA.
Let’s look at each of them:
- Selling Plan – There are two types of selling plans on Amazon: Individual and Professional.
- If you enroll in the Individual Plan, you’ll pay $0.99 per unit sold, plus other selling fees.
- If you enroll in the Professional plan, you’ll pay a monthly fee of $39.99, plus other selling fees.
- Fulfillment Strategy – There are two types of fulfillment strategies: Fulfillment by Amazon and Seller Fulfilled Prime.
- If you use Fulfillment by Amazon, you’ll pay storage fees and fulfillment fees.
- If you use Seller Fulfilled Prime, you’ll pay storage fees, order handling fees, pick & pack fees, and Iight handling fees.
- Product Category – Certain product categories have additional fees, such as long-term storage fees or referral fees. These will be in addition to the other selling and fulfillment fees you’ll pay.
- Other Factors – There are a few other factors that can impact your Amazon FBA costs, such as returns and refunds, overage fees, and closing fees.
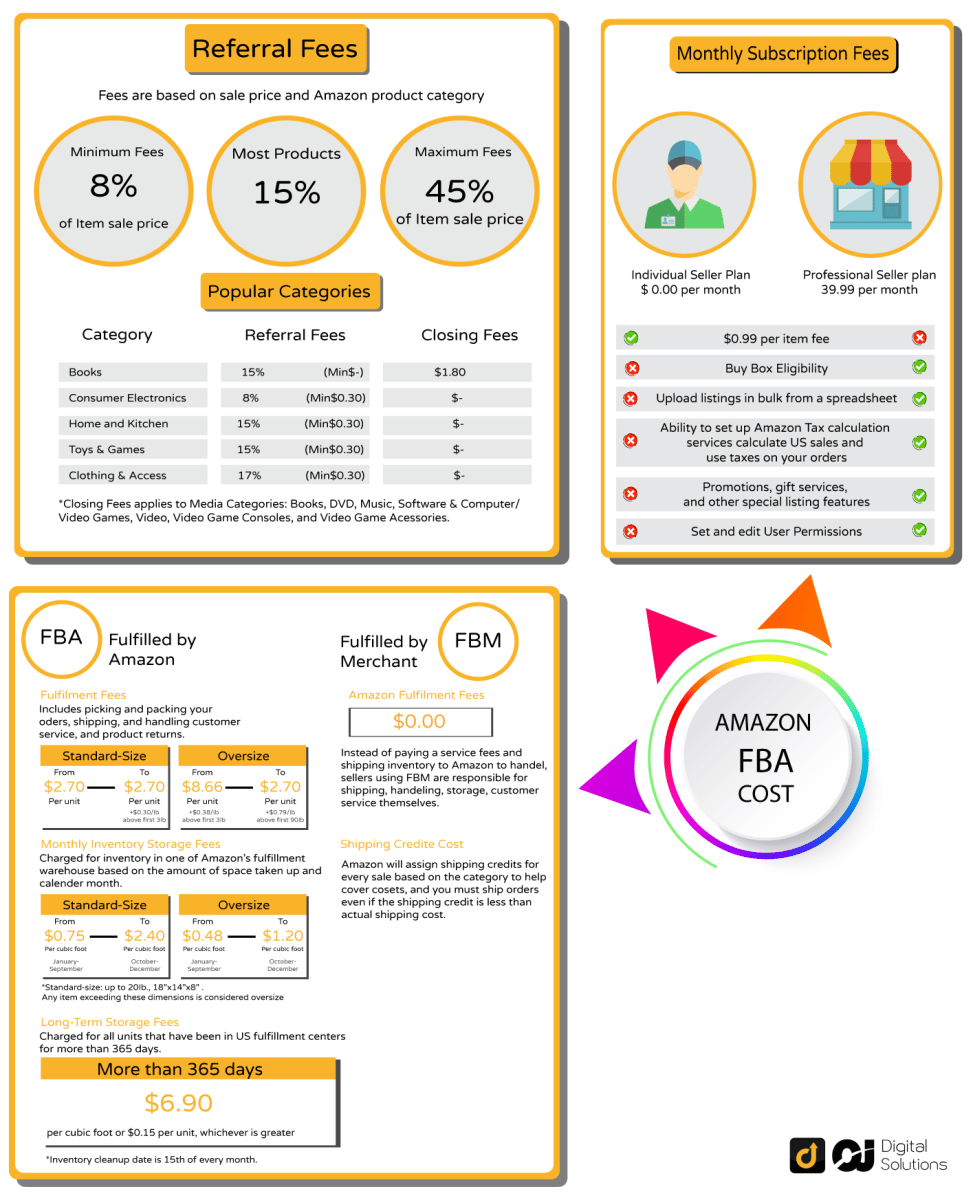
Now that you know what costs a seller incurs on Amazon, let’s take a look at how much Amazon FBA actually costs. When using Fulfillment by Amazon, you’ll need to pay:
1 – Storage Fees – Amazon charges a monthly fee for storing your products in their fulfillment centers. This fee is based on the amount of space your products take up and can vary depending on the time of year.
2 – Fulfillment fees – These are the fees Amazon charges to pick, pack, ship, and deliver your products. The fulfillment fee is based on the weight and dimensions of your product.

All of these factors play a role in how much you’ll pay to use Amazon FBA.
To get an accurate estimate of your costs, I recommend using Amazon’s FBA calculator.
Shipping your FBA inventory to an Amazon Warehouse: A Step-by-Step Guide
Shipping inventory to the Amazon FBA warehouse for the first time may seem like a daunting task.
I have outlined steps that you can follow for a seamless process.
But before I discuss the process, it is important to note that by the time you are shipping your products to Amazon, you should have already created your Amazon seller account and set up FBA, and created optimized listings for your products.
That’s because when you create your shipping plan within Amazon, you will be selecting your products from your existing listings.
Here’s a step-by-step guide on how to ship products to Amazon fulfillment centers:
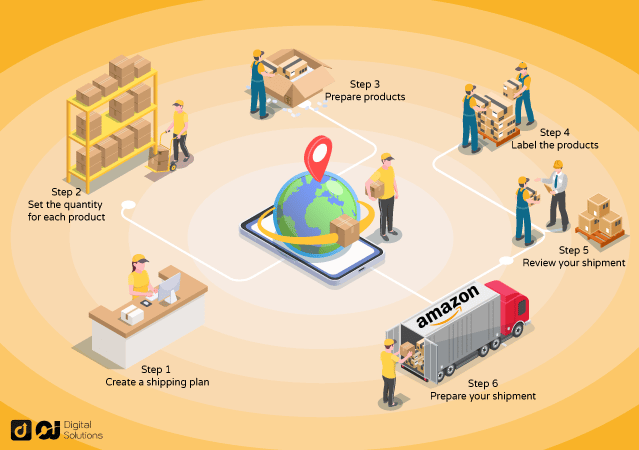
Step 1: Create a shipping plan
The first step is to create a shipping plan in your Amazon Seller Central account. This will allow you to select the products that you want to ship and specify the quantity of each product. The shipping plan should have the following information:
- The items you’re delivering to Amazon
- Each product’s quantity
- The seller shipping method and carrier you choose
- Who will be in charge of product prep and labeling? (Amazon or you)
Go to the Manage Inventory page, selecting each product you want to ship to Amazon.
Then choose the Send/Replenish Inventory option from the Actions in Selected drop down menu.
You get the option of using the Amazon FBA shipping service to create a new shipping plan.


It’s important to double-check your ship-from address.
This could be your home or business address, or the address of a supplier.
The packing type must then be confirmed.
There are two types of packaging to choose from: Case-Packed Products and Individual Products.
Select Individual Products when you’re shipping single items that vary in quantity, condition, and type.
Choose Case-Packed Products if you’d like to send various identical products packaged by the manufacturer or supplier.
Select Continue to shipping plan.
Step 2: Set the quantity for each product
After you select Continue to shipping plan, you’re taken to the next page where you can specify the quantity of each product in your shipment.
This helps Amazon ensure that they have an accurate count of your inventory.
You can either type in the number of units for each product or use the + and – buttons to adjust the quantity. Once you’re done, select Continue.
Once you do this, you will receive a notification which may be any of these:
- Information Required: This means that Amazon needs more information about your product before it can be stored in their warehouse.
- Removal Required: This means that your product is not eligible and needs to be removed.
- Action Recommended: This means that there is an issue with your product, such as it being a slow-moving product. Amazon will recommend that it is removed.
- Excess Inventory: This means that there is more inventory for this product than what is allowed.
Step 3: Prepare products
After you select Continue on the Set Quantity page, you’re taken to the prepare products page, where you can confirm your product details and additional prep instructions.
You’ll need to specify who will be in charge of product preparation.
If you opt for Amazon to handle this, then there are certain products that require special handling or have size or weight restrictions.

You’ll also need to provide prep instructions if you’re handling product preparation yourself. Alternatively, you can use professional Amazon FBA Prep Services to reduce the chance of error.
This includes specifying which products need special labeling, such as those that are Hazardous, Flammable, or Corrosive.
Make sure that you follow all Amazon FBA prep requirements on how to prepare Amazon FBA shipment.
Once you’re done with the prep required, select Continue.
Step 4: Label the products
The next step is to label your products. You can either print out labels yourself or have Amazon send you labels.
Here are the three options when it comes to labeling your products:
- For eligible products, use an existing EAN or UPC barcode.
- Including an Amazon barcode on the packaging or on a product
- Using Amazon’s FBA Label Service and having them apply barcodes for you by paying a per-item cost or fee
If you’re having Amazon send you labels, then they’ll be generated and sent to you electronically.
You can then print them out or have Amazon apply the labels for you when your products are received at their warehouse.
Ensure that you adhere to all FBA product barcode requirements. From choosing the right paper stock and printer, to how to place your label is covered in these guides.
Many Amazon Sellers have their labels printed right onto their product or packaging if they are selling products made by a manufacturer.
This saves both time and money, so I suggest considering it. Take note that manufacturers must still follow FBA labeling and printing guidelines.
All items that need labels are listed in the Labeling Required tab.
You should use the FBA Label Service if you selected Amazon in the Who labels column. Additional fees will be listed in the Label cost column.
You should label the items yourself if Merchant is selected in the Who labels section.
It’s time to make your barcodes now that you have all of this information. Click Print labels, then a PDF file will be created.
Step 5: Review your shipment
The last step is to review your shipment.
This is where you’ll see a summary of all the products that you’re sending to Amazon, as well as the total number of units.
You can edit your shipment by going back to any of the previous steps. Once you’re satisfied with your shipment, select Submit shipment.
The View Shipments page will appear after you have approved shipments. Your shipping plan is now in place, and your package will be delivered to the specified Amazon fulfillment center or centers.
To continue, select Work on shipment.
Step 6: Prepare your shipment
You can now do the following on the Prepare Shipment page:
- Choose a shipping carrier and shipping method.
- Calculate the number of shipping boxes required.
- Schedule and pay for a shipment.
Make labels for the boxes.

It’s critical to meet all shipment packing requirements whenever you’re shipping to Amazon FBA. Minor changes to your shipping plan are still possible, but there is a limit. If you need to make more changes, you should recreate, cancel, or delete the shipment.

In Amazon’s FBA shipment process, the Summary page is the final step. It offers an overview of your shipment, as well as the tracking tools you can use and the status of your shipping plan delivery.
The products you sent to Amazon will be live on your listing and available for customers to buy after it has been received.
Amazon’s Fulfillment by Amazon (FBA) team will now handle your order fulfillment.
Now you might be asking, “how long does it take FBA to process shipment?” It usually takes about 2-6 days.
Create an FBA shipment using “Send to Amazon”
“Send to Amazon” is a quick and easy way to replenish your FBA inventory on Amazon. The benefits of this shipment workflow include:
- Saves time: You don’t have to create a new shipment each time you want to replenish your inventory.
- Shipment options: You can choose whether your inventory should be shipped in on pallets for less than truckload delivery or in individual boxes for small parcel delivery service.
- Fee comparison: You can compare estimated carrier fees to determine whether shipping your inventory as individual boxes or pallets is the most cost-effective option.
- Eliminates mistakes: Amazon will pre-fill key information from your original FBA listing, such as product title and images. This helps reduce the chance of errors.
Follow these steps to create your shipment through “Send To Amazon”:
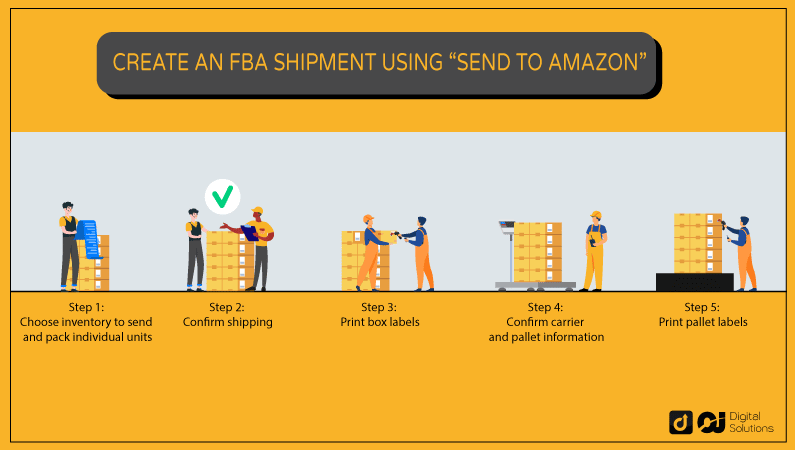
Step 1: Choose inventory to send and pack individual units
You will need to select the products that you want to replenish. You can do this in two ways:
Option A: Select all of the products that need to be replenished. This is the quickest way to create your shipment.
Option B: Select specific products and quantities. Choose this if you want to send a partial shipment or if you need to update your product information.
You’ll also need to select your Amazon FBA Ship from address, as well as the Marketplace destination.
Step 2: Confirm shipping
Confirm your shipping address and contact information, and select your Shipping Method.
Step 3: Print box labels
After you have confirmed your shipping information, you will need to print your box labels. Amazon provides two options for printing labels:
Option A: Use an Amazon-Partnered Carrier
Option B: Use Your Own Carrier
If you choose to use an Amazon-partnered carrier, you will need to print your labels through the Amazon Shipping Services web page. If you choose to use your own carrier, you can print your labels from the carrier’s website.
Step 4: Confirm carrier and pallet information
If you are shipping your inventory on pallets, you will need to confirm your carrier and pallet information in the fourth step.
Step 5: Print pallet labels
In the fifth and final step, you will need to print your pallet labels. Amazon provides two options for printing labels:
Option A: Use an Amazon-Partnered Carrier
Option B: Use Your Own Carrier
If you choose to use an Amazon-partnered carrier, you will need to print your labels through the Amazon Shipping Services webpage. If you choose to use your own carrier, you can print your labels from the carrier’s website.
Tracking details are an essential part of this process:
Amazon will generate carrier tracking ID details for you if you choose to use an Amazon partnered carrier. You don’t have to do anything for this part.
For a non-partnered carrier, you’ll need to get the tracking ID from the carrier and you can either enter the information in the Send to Amazon Tracking details step or in the Shipment summary page’s Track shipment tab.
After you have completed all of the steps, your shipment will be on its way to the Amazon fulfillment center. Once it arrives, the Amazon FBA team will take over and handle the rest.
Common Mistakes To Avoid When Shipping to FBA
When you are shipping your products to Amazon FBA, there are a few common mistakes that you will want to avoid.
These mistakes can cost you time and money, and can also result in your products being rejected by Amazon.
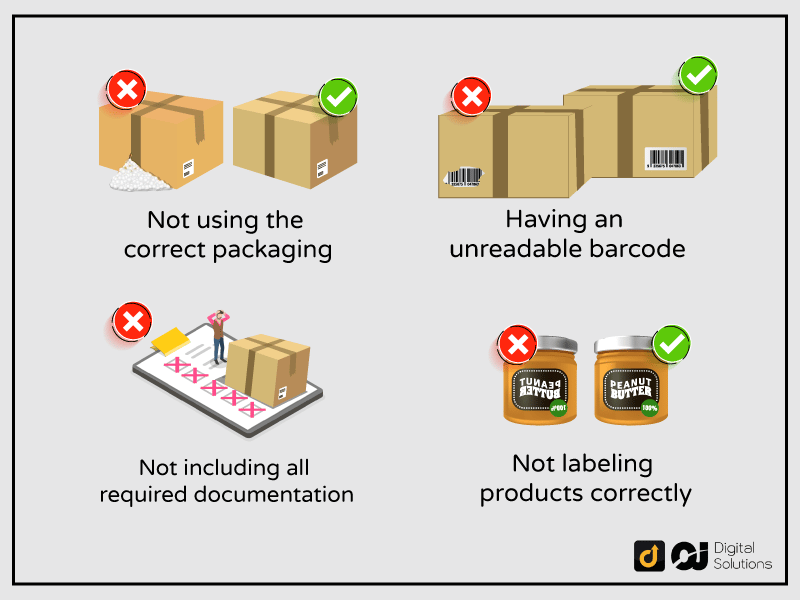
Common mistakes include:
- Not using the correct packaging: Amazon has very specific requirements for the packaging of products that are being shipped to them. If you do not use the correct packaging, your products may be rejected or damaged in transit.
- Not labeling your products correctly: All products that are being shipped to Amazon must be labeled correctly. This includes having the correct product information and barcodes on the labels.
- Not including all required documentation: Amazon requires certain documentation when you are shipping your products to them. This includes a packing list, invoices, and other documents that may be asked of you.
- Having an unreadable barcode: Amazon requires that all products follow a barcode system. If your barcode is unreadable, Amazon may reject your products.
FAQ – Frequently Asked Questions
Do you need a business license to sell on Amazon?
No, you do not need a business license to sell on Amazon. However, you will need to obtain a business license from your state or local government if you are selling your own products.
You may not need a business license if you are selling products that you have sourced from other manufacturers or distributors, Better check with your state or local government to be sure.
Can you sell products directly to Amazon?
Yes, you can sell directly on Amazon, but you will need to create a seller account and have your product listed on the Amazon marketplace.
So that you can sell to Amazon directly, you need to sell your product on wholesale. You also need to make sure that you are meeting Amazon’s requirements consistently.
How do I send a box to Amazon FBA?
You will need to create a shipping plan and include the necessary information such as your product’s dimensions, Iight, and quantity. You will also need to provide your contact and billing information.
After creating a shipping plan, you will need to print out your labels and attach them to your products. Then, you can schedule a pickup or drop off your products at an Amazon fulfillment center.
Is it free to ship to Amazon FBA?
No, it is not free to ship to Amazon FBA. You will need to pay for the cost of shipping your products to Amazon.
However, Amazon does offer a reimbursement program for some of the shipping costs incurred when sending products to their different fulfillment centers.
Final Thoughts
So, there you have it! You’ve come to the end of the complete guide to shipping your products to Amazon’s warehouses.
This shipping process can seem daunting at first, but with a little preparation and organization, it’s definitely doable.
Take things one step at a time, and always keep important details and requirements in mind.

