No matter how good your product is, it just won’t sell if your product listings are not optimized following the latest Amazon A9 algorithm changes.
So if you’re launching a product on Amazon, before even thinking about running promotional campaigns to your listing and getting that sales velocity boost, you have to be prepared to work on the Amazon SEO process — from doing the necessary keyword research and writing a fully optimized product listing, to dealing with customer reviews and ensuring you’ve priced your product right.
All of this gets your listing more clicks and gains your product more visibility. The clicks will turn into conversions and sales.
If that sounds like a lot of work and you have no idea where to start, don’t worry.
That’s exactly what this Amazon Listing Optimization Guide is for. You will learn how to optimize listing on Amazon from A to Z, and we’ll cover every section one by one, so feel free to also use the table of contents to go back to the sections you’re interestes in.
Amazon Listing Optimization Tips and Guidelines
I’m starting with the basics. I’ll cover:
– What makes killer Amazon product listings — what it means to optimize your product listings (and why even bother?)
– The fundamental components of an excellent product detail page
– What strategic Amazon SEO entails, what the A9 algorithm (Amazon ranking algorithm) is and how to rank high on Amazon search engine results, and why all of this is more than worth the effort
Let’s get to it.
Why Is Amazon Listing Optimization Important?
If you are familiar with Google SEO in digital marketing, Amazon SEO strategy is similar to on-page SEO.
With On-page SEO, you make sure that:
1- You find keywords that the internet uses on search engines and add them in the product title, headlines, introduction, and text with the goal of increasing the visibility of the article and for it to be indexed on many keywords related to your product in the search result.
2- When the user lands on your page, they should have the most optimal user experience. This includes factors like content alignment with the user’s search intent, your website speed, the design and layout of the article, etc.
Amazon SEO strategy follows the exact same logic. With Amazon SEO, you use your digital marketing chops to make sure that:
1- The right keywords are added in the title, bullets, and backend search terms with the goal of increasing the visibility of the product listing on the Amazon search engine results page. The listing should also be indexed on many keywords searched on the platform.
2- When potential buyers land on your Amazon listings, they need to find exactly what they are looking for.
Benefits of Amazon SEO
There are 3 things that fully optimized product listings can do for you:
- Increase Organic Traffic & Click Through Rate
Extensive Keyword Research (KR) is KEY to determining which words or phrases are actually relevant enough to insert into your listing copy.
These targeted words or phrases are important to have for Amazon SEO, especially to create an optimized product title.
Now that a potential buyer has clicked or made it to your product listing, they can read more about the product.
The average consumer’s attention span lasts for just about 8 seconds. You want to capture the attention of your target audience within that fleeting 8-second window!
You need to position your product in a benefit-driven way to persuade the buyer that this is the product that will solve their problem.
And that is how you convert a visitor of your page to an actual customer. This is how you raise your conversion rates!
- Increase Sales Volume and Profit
Here’s the formula: More Traffic = More Clicks = More Sales = Higher Search Rankings = Higher Conversion Rates

And then the cycle repeats and the ball will keep rolling from there.
All of that — increasing the Conversion Rate (CR), boosting sales, and so on — is accomplished by the strategically wielded power of words.
Professionally written and optimized product listings will make you money 24/7, as long as your product page is live (and your inventory is well-stocked!).
But, to achieve this, you must have Amazon Listing Optimization down to a science as you launch your products.
Amazon Product Title Best Practices
So… What Goes in Product Titles?
Note that when it comes to a title, the length matters. It has to be a maximum of 200 bytes.
But, at times, it still depends on what product category your listing falls under.
Those under the Clothing and Apparel product categories, for example, can only be 80 bytes long.
For reference, do revisit the style guides on the Seller Central that are Amazon listing guidelines specific to your product category.
Now, how do you do an Amazon product title optimization? How do you start writing your Amazon product title?
Within these 200 bytes, you may begin with your brand name — because who doesn’t want to establish or promote their brand right off the bat? This is also in accordance with Amazon’s style guidelines.
Follow it up with your primary keyword phrase — basically, what the product is (e.g., “Insulated Tumbler” or “Pet Bowls for Dogs”). You need product-identifying information here, of course.
Next — applicable keywords that pertain to certain benefits and product features. If it has dimensions, you may include that important bit of info here (measurements can be abbreviated). If it comes as a set or a multipack, indicate that as well.
Writing Compelling Bullet Points
The Point of Bullet Points
Each Bullet Point gives consumers an overview of the key product features and benefits of the product.
But first, let’s differentiate the two: product Features tell the customer what the product is, while Benefits tell customers why they should buy the product.
Here’s the key: ask yourself if your bullets are benefit-oriented enough.
Think of these as your top five selling points.
An Engaging Amazon Product Description
A Well-Structured Product Description
More people are browsing Amazon product listings on their phones than on their computers.
And here’s the catch:
On mobile devices, consumers see the description first before the bullets.
This is why product descriptions are just as important as the bullet points. You need this part professionally written as well! This is part of keeping your listing optimized for mobile devices.
A product description can be written in a multitude of ways.
But a good description is one that is well-structured — one that flows logically for the reader.
From my experience, the following structure converts the best:
- Consumer Pain Points or shocking statistic
- Introduction of the Product as the Solution
- Additional Product Features
- Call-to-Action (Add to Cart/Basket NOW!)
Here is an example of what a well-crafted and properly written description looks like in its entirety!

And if you need a bit of help writing up your listing, you’re in luck. We’ve got some Amazon copywriting tips for you!
AN IMPORTANT NOTE: Just be sure that as you work on all the components of your listing, from the Title and Bullet Points down to the Product Description, always be sure you’re complying with Amazon guidelines on the Seller Central, especially when it comes to length, prohibited terms, product claims, copyright infringement, and such! You don’t want your Amazon listing suppressed!
Amazon Keyword Research Guide
Now, things are getting exciting!
In this section, we get into the nitty-gritty of the keyword research process, an essential part of my Amazon product listing optimization using Helium 10.
There are two methods that you can look at with Helium 10 — optimizing your listing via Magnet or Cerebro.
I will be covering the Cerebro tool within the software.
Take notes and follow me closely!
What is Helium 10?
Helium 10 is the all-in-one software we use as Amazon sellers, especially when it comes to KR.
Now, we’re not gonna go over ALL of the paid or free tools you can explore on the platform.
We’ll just handpick the most important Amazon SEO tools you need to know about — Scribbles, Frankenstein, and Cerebro.
Scribbles
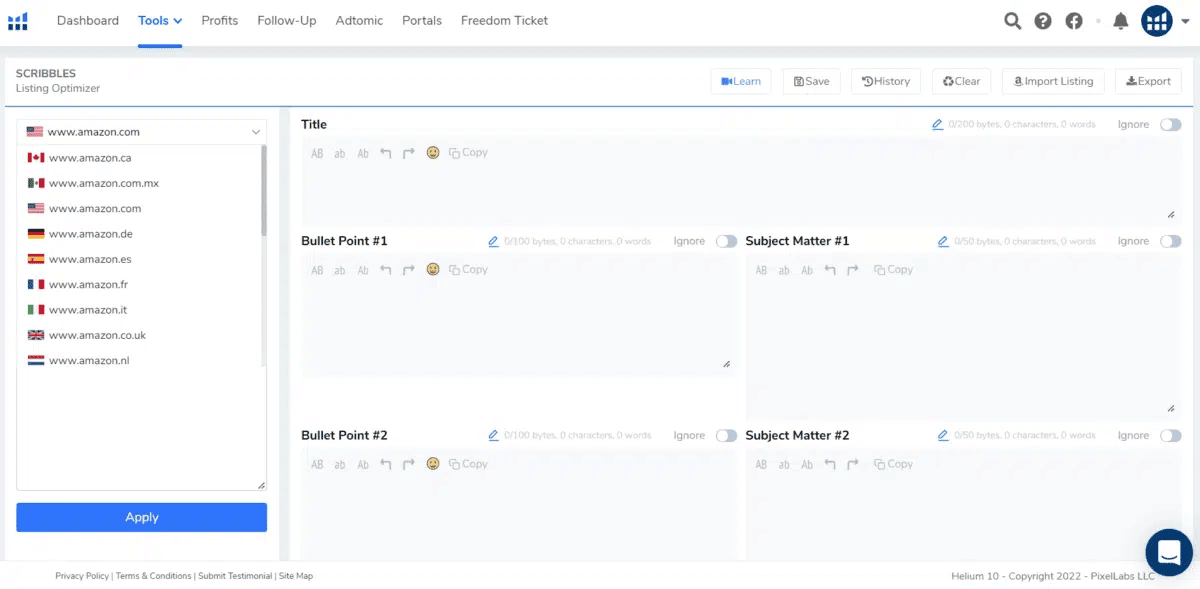
Scribbles is the Amazon listing optimization tool we use on Helium 10.
Basically, it’s a tool with various fields where you get to input your Product Title, Bullet Points, Product Description, and Backend Keywords.
Not only is it helpful for you to keep your copy within the byte count, but it’s also where you get to do the full Amazon search engine optimization by inserting the most relevant keywords based on your KR, which we will discuss in greater detail below.
Conduct Keyword Research via Cerebro
If you want to do a deep Amazon search and extract keywords while taking your competitors and ranking factors into consideration, this is where Cerebro comes in.
Cerebro is anchored on a Reverse ASIN Lookup process.
You begin on Cerebro by searching for your top competitors on Amazon’s search results page.
Then, you extract the high search volume keywords they’re indexed for, and then strategically use search filters to find the relevant keywords they rank for. You then use related keywords in your own product listing.
Now, how do you do that?
The first thing you need is the Helium 10 Extension, which you can easily download onto your browser.
But you won’t have to open it until you’re on Amazon and you’ve typed in your primary keyword into the search bar.
Once the search results appear, THAT’s when the Helium 10 Extension comes in handy.
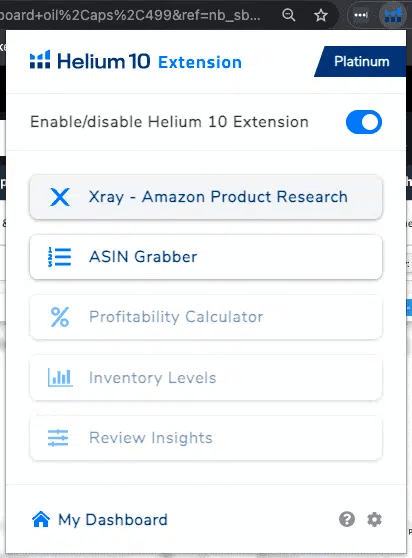
Open it and select XRay – Amazon Product Research.
A table like this pops up, and Xray will give you access to plenty of information on the competitor products that would come up on the search results:
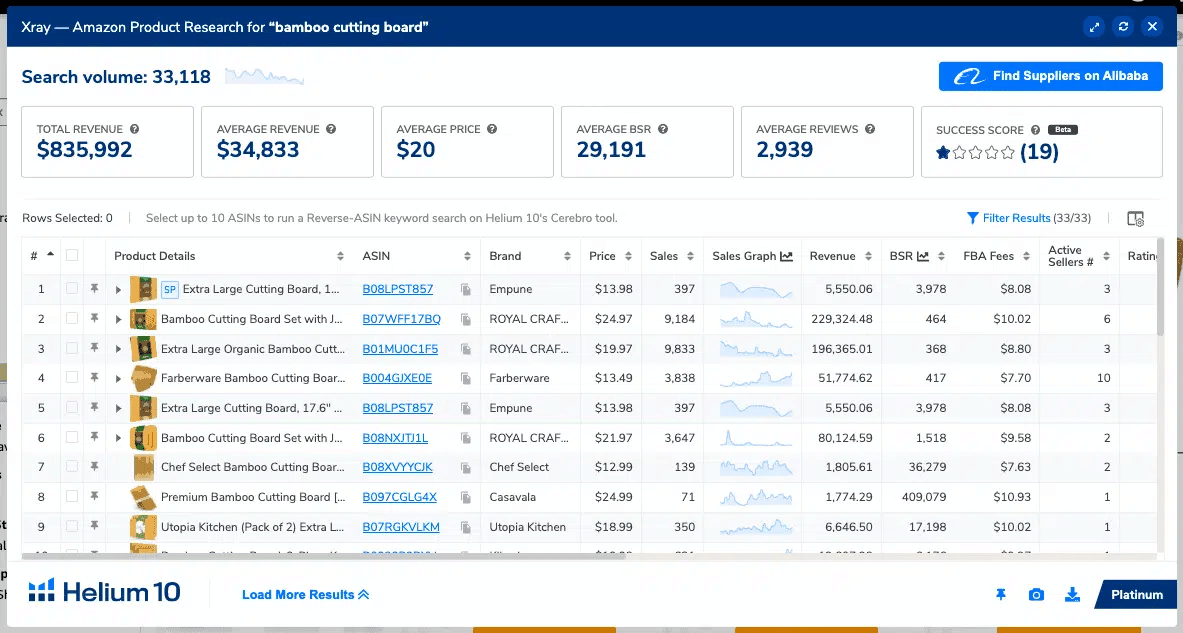
Then, you can arrange these products from the top-selling ones down to the lowest in sales by clicking the top of the Sales column.
This will show you which among the competitors are selling the most on Amazon.
You can choose up to 10 top-selling Competitor Products.
Hovering on their ASIN or Amazon Standard Identification Number will give you a little preview of the product so you can see right away if it’s similar to yours.
Go ahead and comb through them! You want to select products that are pretty much the same product you’re selling.
So if you’re selling a bamboo cutting board, choose top-selling bamboo cutting boards.
Leave out plastic cutting boards that show up on the search result, or those that aren’t made of the same material as your item, for instance.

Once you’ve picked a maximum of 10 ASINs, input them into Cerebro and click “Get Keywords.”
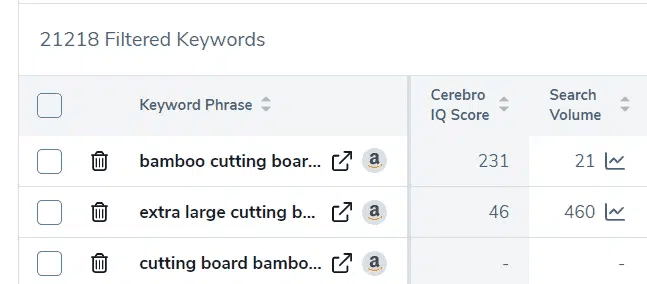
Here are your keywords! Now — 21,218 keywords from Organic search results? Nobody has time to go through all of that.
We’re going to significantly narrow down the search results.
Let’s first try to play with the Search Volume field. Given such a competitive product, we can try to filter the keywords to, say, up to a minimum of 1,000 for the Volume.
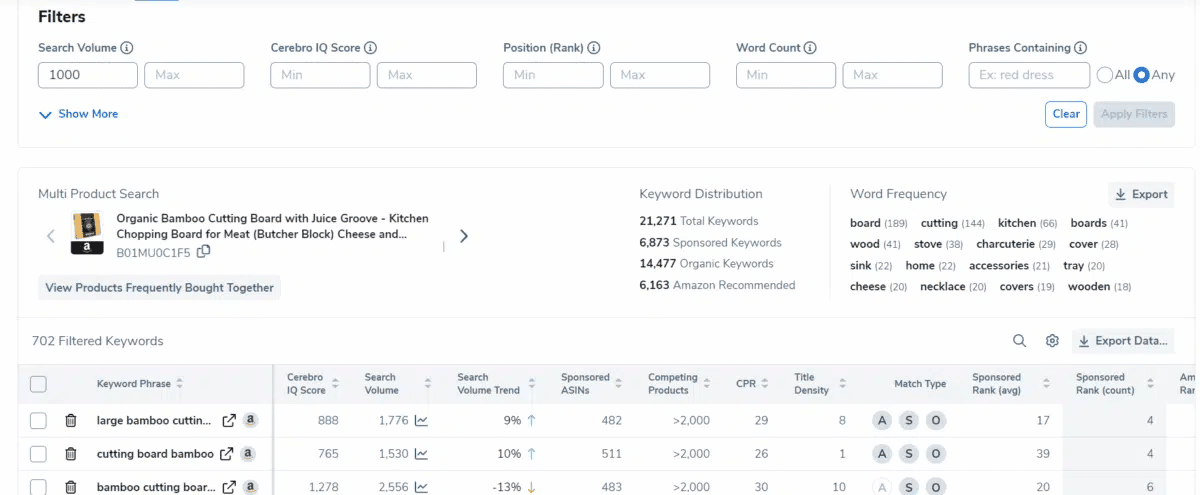
702 filtered keywords!
Okay. Now, let’s narrow this down some more by using the Excluded Phrases Containing field in the Filters section.
We trim our keywords list by looking at the Word Frequency box in the upper left and getting rid of any recurring terms that really don’t have anything to do with your product.
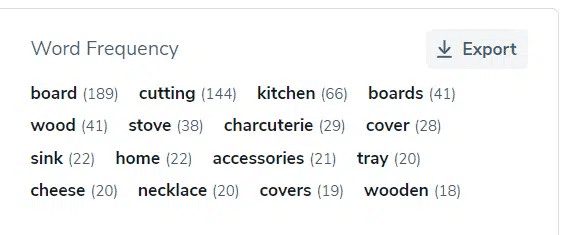
Like so:

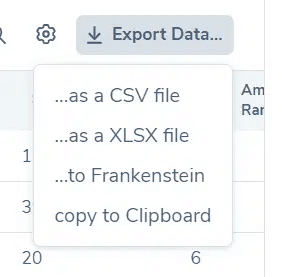
Click “Apply” and whatever you’re left with will be exported once again to Frankenstein to get your keyword list.
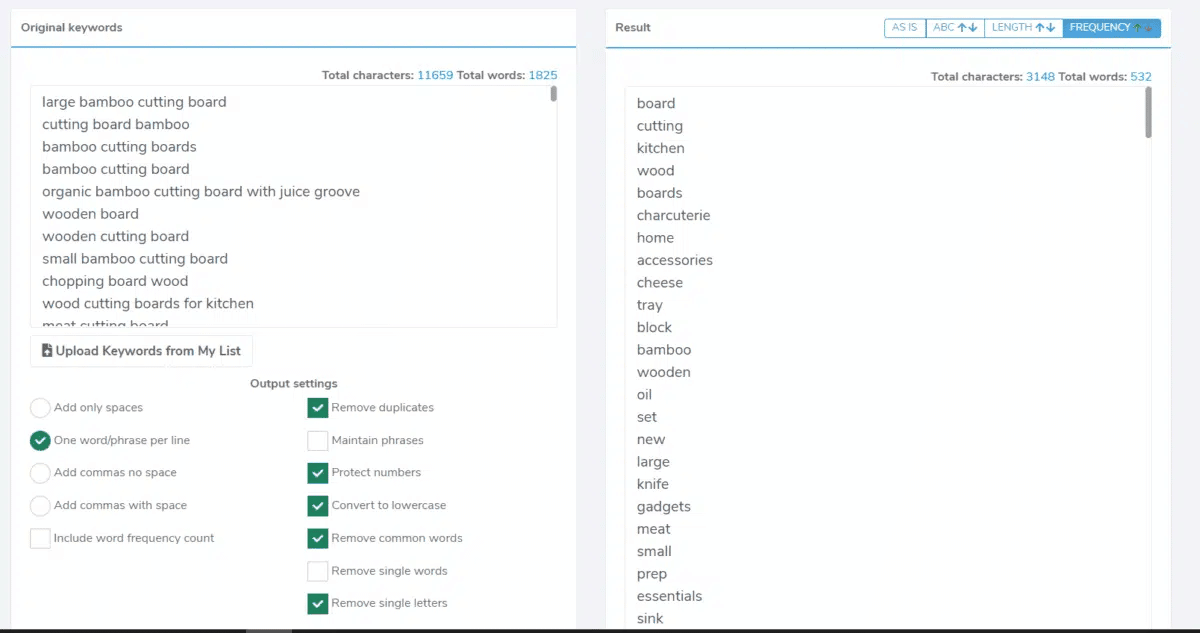
Again, select the following: “One word/phrase per line,” “Remove duplicates,” “Protect numbers,” “Convert to lowercase,” “Remove common words,” and “Remove single letters.”
And don’t forget to click “Frequency” at the upper right to arrange the keywords on your list from the highest to lowest frequency.
Now, we go back to Scribbles and copy the Single Keyword List. But — how about our Keyword Phrases this time?
We go back to Cerebro and, this time, we will further filter the keywords using Product Ranking. This means we’ll be using Keyword Phrases extracted from products with high search rankings on the Amazon marketplace — products which are on Page 1.
If you go back to check your Amazon search results earlier, you’ll notice that page 1 shows the first 48 products.

Using this as a basis, we can then try to use, say, 1-40 for our Product Ranking range.

And this gives us…

Some 100 keywords left to comb through!
Next — on Cerebro, you can simply narrow this down further by deleting irrelevant keyword phrases, or those with brands, misspellings, etc. by clicking on the “x” buttons on each row.
Scan the keywords and remove those that you don’t need to include in your list.
For example, we can get rid of “bbq prep tub” since that’s not your product.

Once you’re done, you can also arrange these phrases from the highest to lowest Search Volume by clicking the top of the column.
And you can also export the phrases and the KR information into a comprehensive Excel file.
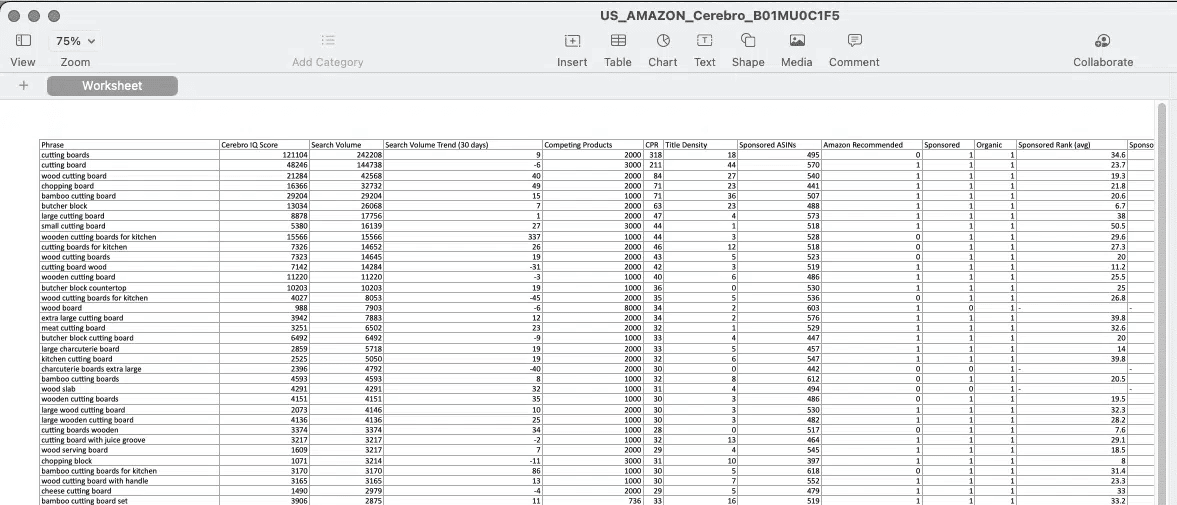
Or, you can just simply export them to Frankenstein.
PRO TIP: The numbers will always vary from product to product. It’s not an exact science! You may need a smaller or bigger minimum volume, or expand the ranking range you’re going to use.
YET ANOTHER PRO TIP: How long this process takes you depends on how efficiently or successfully you’re able to play around with the filters available on Cerebro as you do your KR. You’ll get the hang of it!
LAST TIP: Quality over quantity! You don’t need a super long list of Keyword Phrases. Sometimes, it’s better to have a shorter list of really high-volume phrases so you can focus on using the keywords that matter as you go through the Amazon SEO process.
Now, where were we?
Let’s say you’ve exported your Keywords and then your Keyword Phrases to Frankenstein, and you’ve arranged each list by Frequency as well.
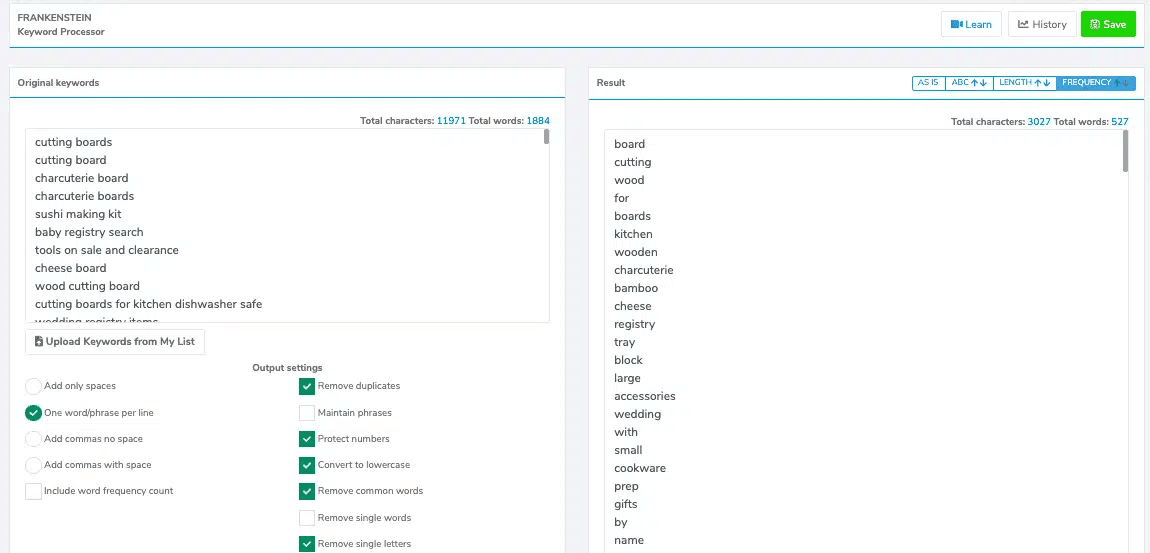
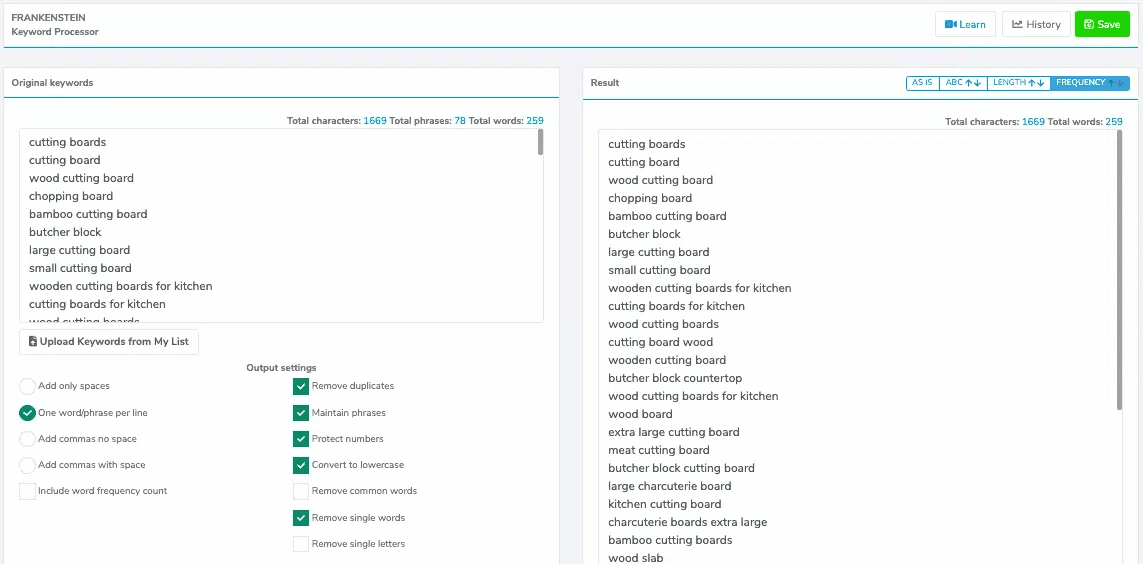
You then copy them again onto Scribbles and it’s time to insert the phrases into your copy.
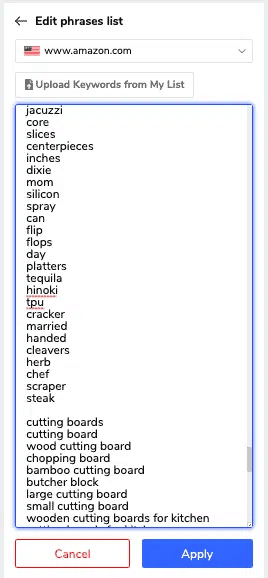
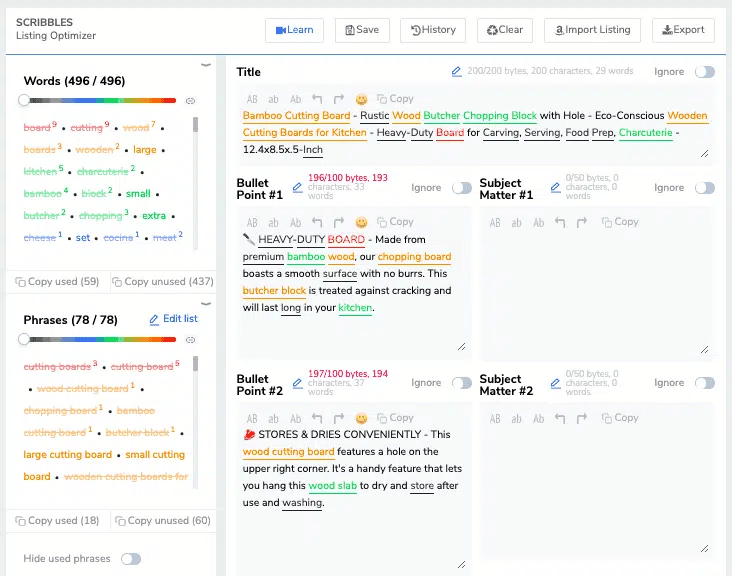
Now, how do you optimize your Amazon listings using the results of your KR?
Don’t fret — that’s what the next chapter is for!
Amazon Listing Keyword Optimization is Key
Now that you’re done with KR, it’s time to utilize the keywords and phrases that you’ve extracted and incorporate them into your listing copy — from the Title and bullets, down to your Backend Keywords.
Time to optimize your Amazon listing!
In this chapter, I’ll give you some helpful strategies on how to do the optimization process — like an Amazon search engine optimization (Amazon SEO) boss!
From Frankenstein to Scribbles
What you now have is your list of short tail and long tail keywords and phrases exported onto Frankenstein.
So what should you do next?
Now is the time to incorporate these words into your product listing copy. This is what Keyword Optimization in Amazon SEO strategy is all about.
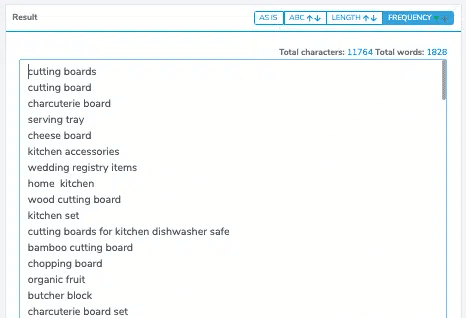
You then add them in the same box as the keyword list on Scribbles, on a separate line:
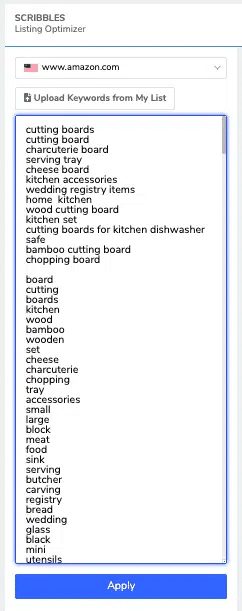
Click “Apply” and then…
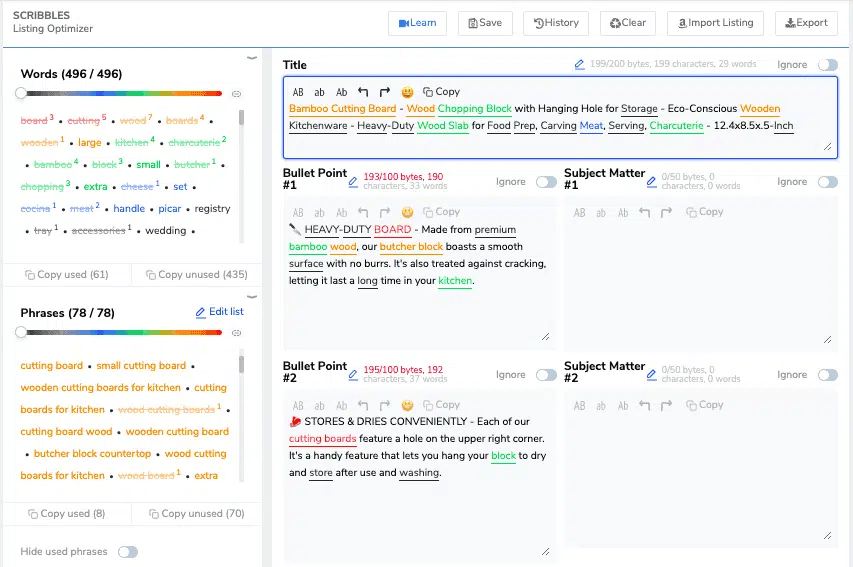
Voila!
You now see your short tail and long tail keywords coloring up your product listing copy on Scribbles.
On the left-hand panels, you see words in red and those are the most frequently found words from the list, followed by orange, green, blue, and then black.
As you may have guessed, the goal is to incorporate these frequently appearing terms into the copy and insert them in the title and bullet points.
That, my friend, is Optimization.
Let’s go over the different parts of the listing that will need to be optimized: the Title, the Bullet Points, and the Backend Keywords.
These are all crucial to boost your ranking in the search results.
Optimized Product Titles

Here, you see an optimized title with keywords and phrases inserted.
The phrases we’ve used in the title are: “bamboo cutting board” and “chopping block.”
However, if you look at the Phrases box at the bottom left part of your Scribbles page, you will see that “cutting board” is also already crossed off the list, meaning it will also be indexed by Amazon.
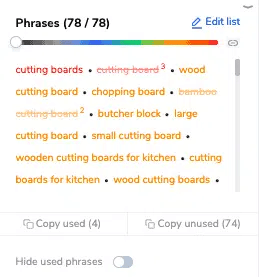
This is because once you use “bamboo cutting board,” “cutting board” will also count.
It’s sort of like hitting two birds with one stone when you pile on keyword phrases like that.
This way, you don’t have to use “bamboo cutting board” and “cutting board” separately, leaving you with enough space to squeeze in some more relevant keywords.
In the title, be sure that you use your seed Keyword Phrase, in this case — “bamboo cutting board.”
But also try to insert, say, about two more phrases in the title.
However, this doesn’t mean you can haphazardly throw keyword phrases together especially when they don’t make sense to do so anymore.
Note: No keyword stuffing!
Also, as you can see, “cutting boards” hasn’t been used in the title just yet.
That’s because we used “bamboo cutting board” and “cutting board” already to prioritize the primary phrase, and the word “cutting” would be an overlap.
Instead, we try to insert phrases in such a way that words aren’t repeated throughout the title.
“Wood” and “Wooden” are separate terms, which is why it’s fine to have them both in the title.
What wouldn’t be so advisable would be to have, for example, “block” and “blocks,” or “board” and “boards.”
This is because, throughout your listing, once you’ve used the singular form of a keyword, its plural form gets indexed as well.
So if you can, just use what space you have for another term.
This way, we’re further able to use up valuable byte count getting as many words and phrases indexed as possible.
Besides… if highly relevant phrases like “cutting boards” (it’s in red, after all) or “wood cutting board” can’t be used in the title, we still have the bullets where we can use them instead.
PRO TIP: You might have heard about the Canonical URL. If not, the canonical URL is, simply put, the Product Listing’s URL. More specifically, the five words that appear on the URL after “amazon.com” and before the ASIN. You can decide and change the keywords that appear on the canonical URL by having those five keywords in the beginning of product titles followed by the dash (-). But keep in mind that this does not have any effect on Amazon SEO. It is just believed to help a little bit with Google’s SEO, although it’s not verified and the impact is VERY minimal.

Optimizing Each Bullet Point
Above, you can see the five points fully optimized with keywords and phrases – and not stuffed with too many keywords, too!
The total numbers of tracked Words and Phrases used are 40 and 18, respectively, as you can see on the left hand panels.
Now, this is quite numerous already!
This means your product will be indexed for, at the very least, a total of 40 unique, high-ranking words and any phrase made up of those words that customers could possibly search for on Amazon.
But guess what — the work isn’t done just yet.
Backend Search Terms
The next step?
We begin to gather additional search terms to be added in the Seller Central’s Backend, which Amazon actually allows you to do.
For this, you get to use all of the keywords that you have yet to use for the Amazon SEO process.
You just have to choose the most relevant ones.
An easy way to do this is to click “Copy unused” on the Words panel located on the upper left of your Scribbles page.
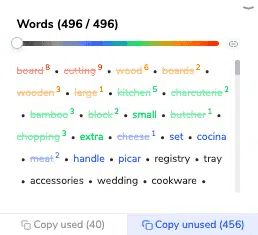
Then, you paste these words back onto Frankenstein.
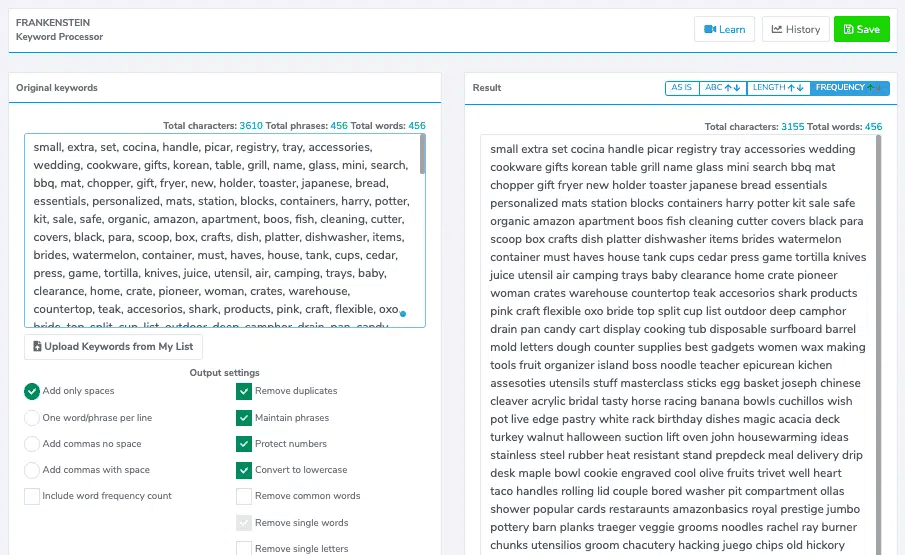
This time, you tick “Add only spaces” to separate each keyword with spaces instead of commas.
These words are still arranged according to Frequency.
Now, this is where you start to handpick the relevant words, or simply just remove irrelevant terms one by one — until you have 250 bytes worth of words, which is Amazon’s limit for Backend Keywords.
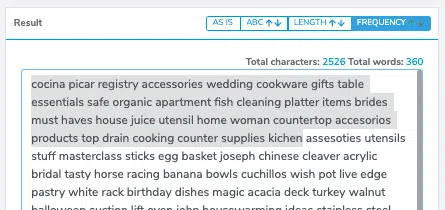
Remember — you don’t want to just haphazardly pick the first words making up your 250 bytes.
You have to make sure that you’re selecting terms that are actually relevant to your product.
Now that you’ve selected all the relevant terms, it’s time to copy them onto Scribbles to check if we have enough and we didn’t go over the byte count limit!

246 bytes. This is perfect now. These are the terms that you will add into the Search Terms field using your Amazon Seller Central account.
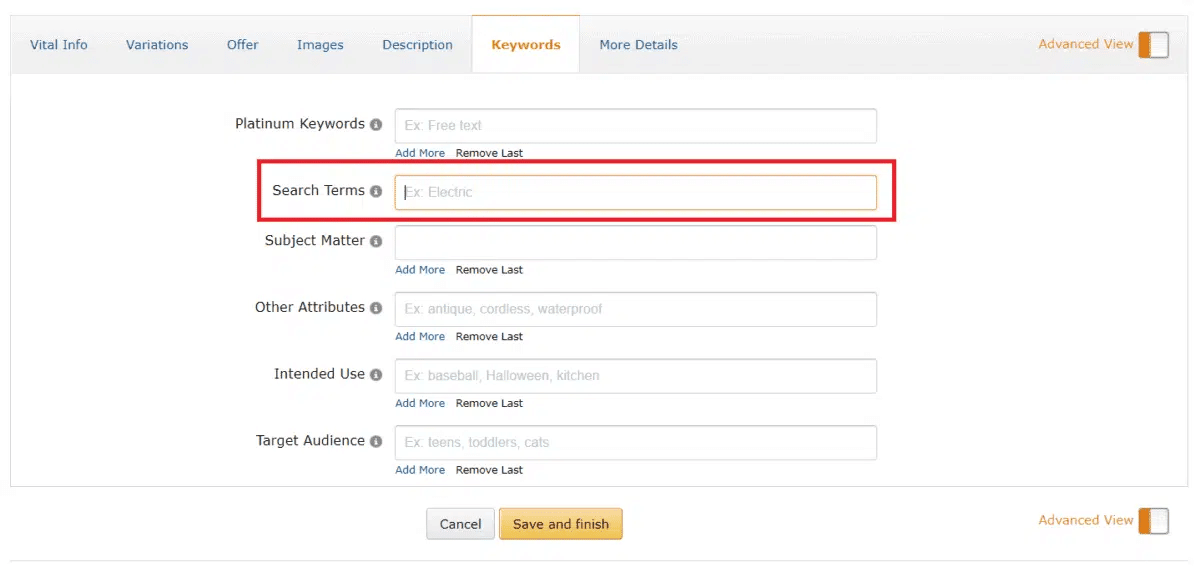
Note: if you’re selling in Europe, you might not have all these fields but only the Search Terms field.
PRO TIP: Again, if the singular form of a word has already been used in the Title or BPs, even as a part of a phrase, we don’t need to include the plural form of the word in the Backend Search Terms. This frees up space for another term!
YET ANOTHER TIP: Especially if you’re selling in the US market, these terms may also include Spanish or other foreign terms related to the product as they’re also highly searched at times. So are common misspellings!
SECOND TO THE LAST NOTE: A search term may be related to your product, but it doesn’t mean it’s entirely relevant. Assess each term carefully! Relevance is the priority so select all relevant terms first, and then go broader if you need more terms.
LASTLY: There are words that you don’t want to include in the Backend, and this includes promotion-related terms like “new,” “discounted,” “best,” “trending,” “good deal,” and the like. Don’t include brand names, and you also don’t need to add articles, filler words, prepositions, conjunctions, etc.
A FINAL NOTE, FOR REAL: You might ask, what about product descriptions? Well, it’s actually a bit ambiguous. We don’t really consider it during optimization to avoid any risk. But hey — including your main phrases here won’t hurt! You’re actually even likely to do so, anyway. So go ahead and add some of them in the Description, but your priority is to have them in the Title, Bullet Points, and Backend Keywords.
Amazon Product Image Optimization
So you’ve fully optimized your Product Listing copy… what’s next?
Let’s not forget that your listing also includes visual assets or collaterals that potential customers can view to get a better idea of what your product is like.
Well, I’ve got the lowdown on how to present your listing images in your listing in a way that will further help you sell your item.
Amazon Image Requirements: How to Optimize Your Amazon Product Photos
The fact is, great images can justify the price and close the sale.
This is why it’s important to be strategic when it comes to choosing the right images to go into your listing.
But, first things first — you want to be sure you’re following the minimum Amazon image requirements for optimizing product photos:
- JPEG is the preferred format, but TIFF, PNG, and GIF (not animated) files are alright.
- A minimum of 72 dpi for the image resolution
- Use RGB and not CMYK (this isn’t a magazine!)
- 1,000 pixels minimum for the longest side (so users can zoom in on your image)
Those are the main things you need to know, and the rest goes without saying:
All product images must accurately represent the product being sold, match the title, must not be blurry or pixelated, must not be sexually suggestive nor contain nudity, and so on and so forth.
Amazon recommends that you provide 6 quality images and a video (Only for Amazon-registered brands).
Remember that you want these graphic assets to make it easy for customers to evaluate your product.
They should be clear, informative, and visually appealing.
You may want to check out Amazon’s full guidelines when it comes to their image requirements here for the whole shebang, or keep reading for some more pertinent details.
The Main Image
Your Main Image should show your product with a white background. It should be a professional photo of the item — not an illustration, not a mockup, not a placeholder.
No texts, logos, color blocks, or anything other than the product itself and a pure white background, basically.
And no accessories or props of any kind, please.
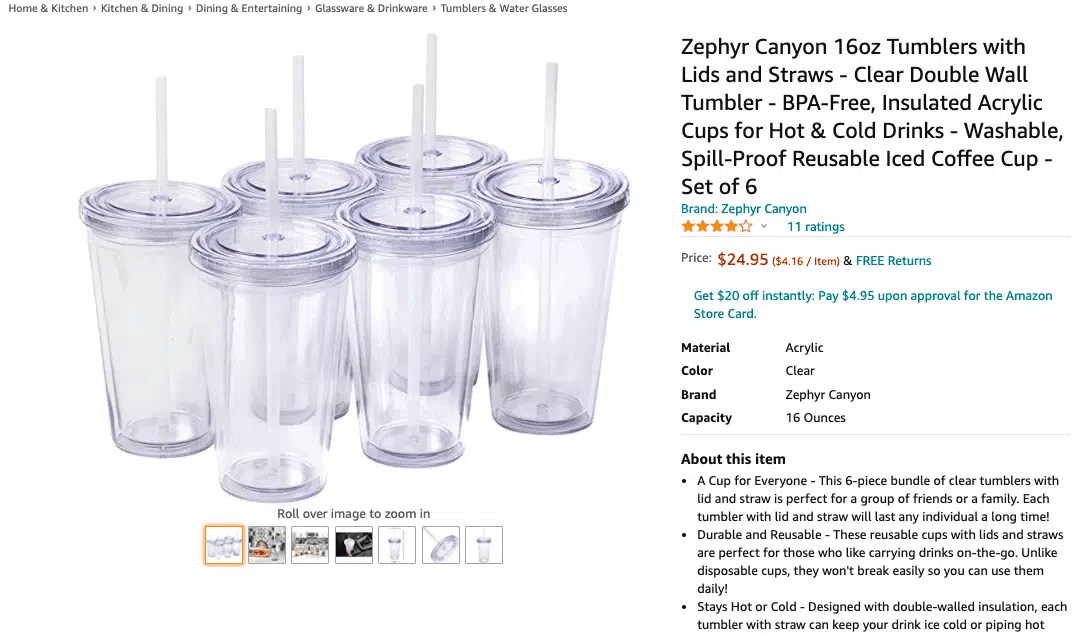
Plus, the product needs to occupy at least 85% of the image, and the entire item should be visible without anything getting cropped out of frame.
And it should be outside of the packaging (depending on the product as there are some exceptions).
NOTE: If your product falls under the Clothing product categories, do check with Amazon image requirements for further specifics.
Additional Images
If you’re worried about the Main image not telling potential buyers much, don’t worry — that’s what the additional images are for.
These extra photos are where you can further show off your item.
Show it with its lovely packaging, the accessories that come with it, how it’s used in different environments and situations (a.k.a. lifestyle images), a closer look at its material, etc. Professional Amazon product photography will help you greatly.
This way, you’re able to offer more information about what your product is and what it does — its dimensions, what benefits and product features it provides the user, and what its USPs (Unique Selling Points) are.
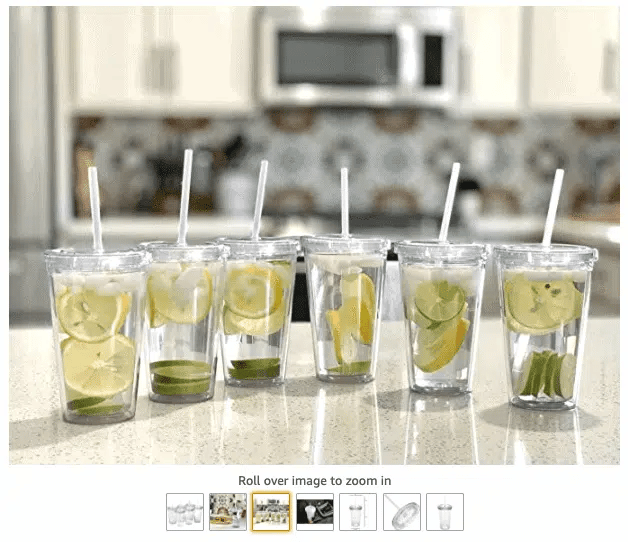
Also, all Amazon images should be at least 1,000 pixels, though 500 pixels is the actual minimum for the platform.
Why?
Because high quality images that are 1,000 pixels and above (10,000 is the maximum) allow users to zoom into your product while hovering over the image.
I personally like to do them even bigger than that. 2,000 pixels +
This gives potential buyers a reeaaally good look at your product.

Furthermore, additional photos shouldn’t use badges that are used by Amazon — plus, the variations and modifications may end up confusing buyers.
Some examples are “Amazon’s Choice,” “Premium Choice,” “Best Seller” or “Top Seller,” “Works with Amazon Alexa,” and the like.
For further information on these, do refer to Amazon’s pertinent guidelines on using Amazon badges on additional photos — or anywhere — here.
(But if you do want to get that legit Amazon’s Choice badge for your listing when it comes up as consumers search the platform, you can learn more about that from the link above.)
PRO TIPS:
- Through additional images, demonstrate the uses of your product. Show off its versatility by showing the item being used in different ways.
- Show different angles of your item, too, if you haven’t already used the 360-degree function available to vendors.
- It can help to dedicate a photo or two to inform the buyer about certain specifications and product functions that they need to know about.
- ALWAYS give accurate details. Accurate information. Accurate colors. Accurate dimensions. Accurate sizes. Accurate inclusions. Accurate product materials.
The Customer Questions & Answers Section
Just because you’re selling on an online platform doesn’t mean you don’t get to interact with your buyers.
Through Amazon, they can ask you about certain details about your product, and it’s up to you to provide enough information in your answer to push them towards deciding to buy your product.
The question is — how?
Communication with Customers
The Customer Questions & Answers section gives you the chance to connect with your potential buyer.
Remember, you’re not selling your products at a store where you can easily chat with customers and peddle your items.
You’re selling your goods through your computer screen.
But if you think that totally limits your ability to persuade customers to buy your product, you couldn’t be more wrong.
Lucky for you!
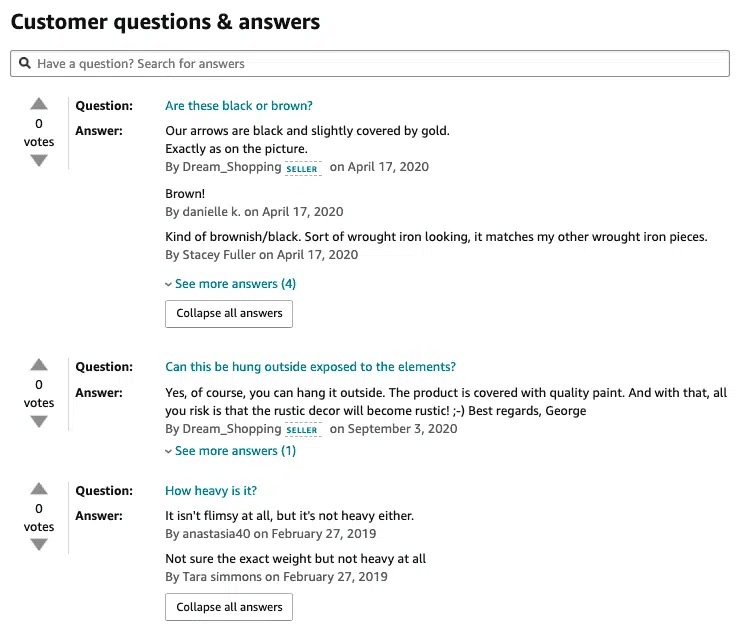
Customers can ask pertinent questions about your product, and Amazon sellers and customers alike can answer each question with the details people might need before they make a decision.
Do they add the item to their cart and check out? Or will they move on to another product that has all the answers they’re looking for?
Actively responding to customer queries allows you to seal the deal — right then and there.
REMEMBER: Customer Service lies at the core of any business — even online.
The Customer Questions & Answers section on your Amazon product page is exactly a reflection of how much you value providing your target audience an overall positive customer experience.
Their experience from Q&As can determine how they’ll review your product.
Will they give you Five Stars for excellent service? Or will they leave bad feedback for all other customers to see?
Positive reviews are essential to how good your product will perform on Amazon.
And we’ll tackle exactly why in the next chapter.
Dealing With Customer Reviews
Why It’s Important to Review the Reviews
If you’ve ever purchased anything online with great consideration, you know that browsing Customer Reviews is just as important as checking out the Product Images or reading the fine print of Product Descriptions.
Positive reviews give potential buyers a good picture of whether or not your product will work for them — what it’s like, how easy it is to use, what sets it apart from others, and so on.
While your listing copy has probably covered all of these, this section gives buyers an idea of what the actual experience of using your product is like, coming from other users who have purchased the same item and tried it out.
This can be the deciding factor for them, should they determine whether they’ll Add to Cart or not.
For sellers, the importance of monitoring reviews cannot be further emphasized.
First, it lets you see through a customer’s perspective. What is there to improve about your product? What is something that your audience loves about your product that you can highlight further?
Secondly, it allows you to counter negative reviews and offer support wherever needed. This is a way for other viewers of your listing to see your dedication to providing excellent customer service.
Plus, by kindly and appropriately responding to any negative feedback that you may receive, other potential buyers are also able to see not just the side of the disgruntled customer, but also your piece of mind as the seller.
Then, it’s fair game, wouldn’t you say?
Amazon Product Price Optimization
Can you believe we’re down to the last chapter of this guide?
If you’ve reached this chapter, then you have almost everything you need to know before your Amazon product launch!
But you might think you’re forgetting something. How do you actually put a price tag on your product? What Amazon pricing strategy should you consider?
Time to discuss pricing strategies on Amazon to set your online business up for success!
Did You Get the Price Right?
It’s no use doing everything we’ve explained before this chapter if the price of your product ain’t right.
You compete with other sellers on sooo many levels — from climbing product rankings using Amazon SEO down to coming up with the most engaging A+ content (if you’re a registered brand) or description.
But the most important parameter?
The price of your product compared to that of your direct competitors.
In fact, according to Statista, one of the top reasons why people shop on Amazon is getting the best price.
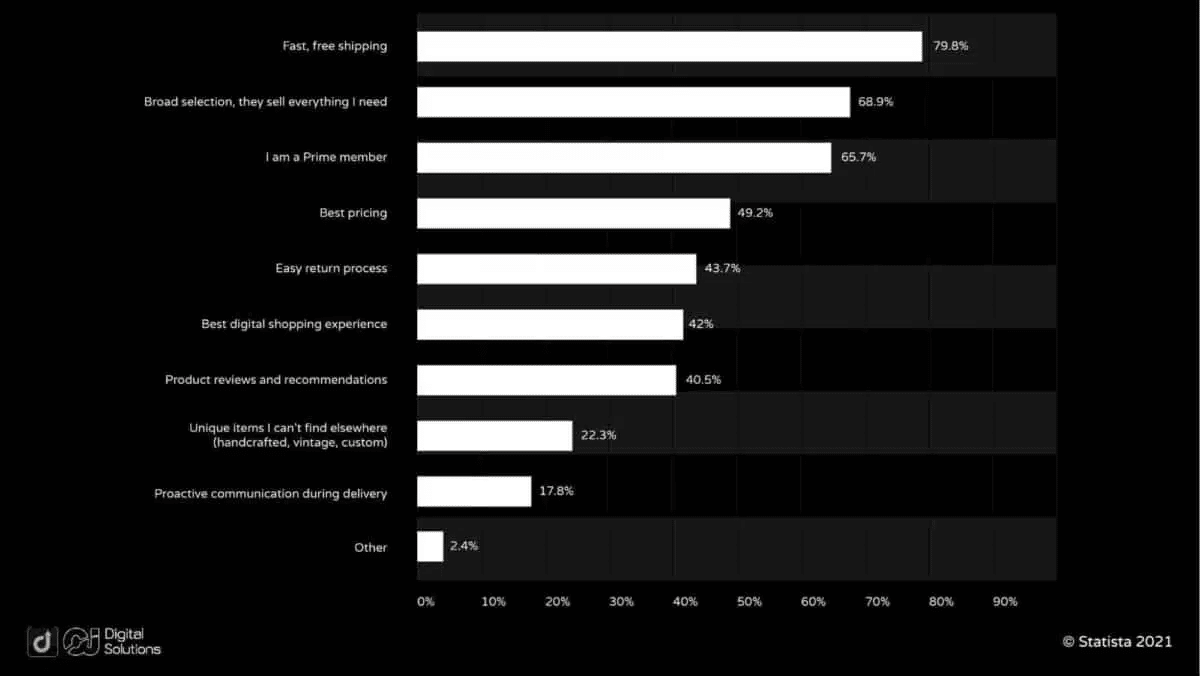
So what does this tell you?
Online shoppers ALWAYS compare prices.
The price is also weaved into Amazon’s A9 algorithm (Amazon search engine), and it affects your product visibility and ranking.
After all, who in their right mind would choose the product with the most expensive price tag if they can choose cheaper alternatives and save themselves extra bucks?
Or, what’s stopping consumers from choosing competitively priced products that offer more in terms of quality?
Every customer wants a good deal. But customers also want value for their money.
Now, it’s all a balancing act on your part as a seller to ensure that your Amazon price is competitive.
In summary, the price has to:
1- Maximize your profit margin and your overall sales
2- Be aligned with the customer’s perceived value. It has to JUSTIFY what they are getting.
This is where Product Pricing Optimization and winning the Buy Box comes in.
The Winning Mindset
1- Be The Unicorn In A Field Of Horses
Chances are, there are hundreds of vendors selling the same product you’re selling.
So differentiating yourself is KEY.
And I don’t mean by differentiating yourself just by adding your logo or changing the color of the product.
Let’s take a classic product for example: Birthday Candles.
Here are some proven differentiation techniques that can help you avoid price wars and, in many cases, set a higher price:
- The “Buy in Bulk” method
This works very well for products that people like buying in quantities to save a few bucks per unit, like protein powders, dog food, diapers and other consumables in general.
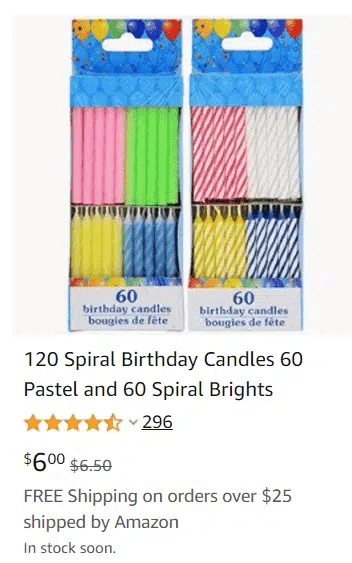
WARNING: If other sellers use this method, then it is not a USP anymore. Think plate sets, cutlery, tea cups and spice jars…these are already sold in bulk/sets by default.
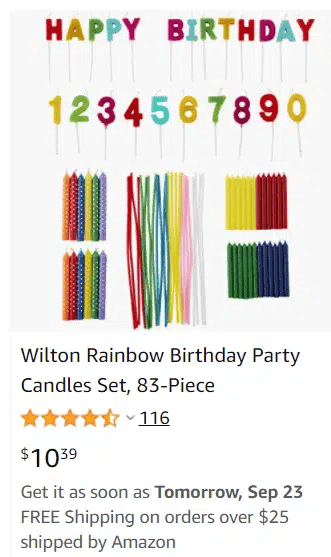
- The Bundle Method
Basically you are just combining different items in the same package to offer a more complete solution to the customer’s problem.
For example, why would someone buy birthday candles? To celebrate someone’s birthday by throwing a gathering or a party right?
So what can you add in your bundle to help them better accomplish their mission?
- The “This Product Matches My Identity” Method
I couldn’t think of a more original name, sorry about that…
Many people have adopted the “eco-friendly” lifestyle as part of who they are, their identity.
Marketing these candles as being eco-friendly will directly speak to that category of customers, and their internal dialogue will be like: Eco-friendly? Yep! That is what I stand for.
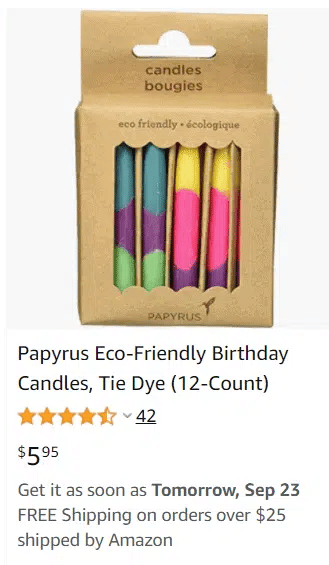
This strategy works very well if you are marketing to people who are part of a movement. Think vegans, woman bosses, digital nomads, black lives matter etc.
Or they deeply identify with a role, hobby, job or nationality. For example, pilots, plumbers, afros, golf players, fathers, mothers etc.
- The Ideal Gift Method
Imagine this candle without the funny quote.
I bet the price would be cut in half.
By just adding a sticker with a quote on it, this product is now a funny gag gift.

Not too shabby.
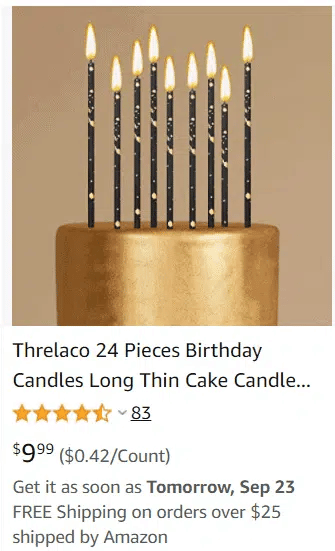
- The Unique Design Method
This is one of the easiest ways to differentiate your product and it works like a charm.
- The Handmade/Authentic Feel Method
I’m a sucker for handmade items.
It gives the product more authenticity, knowing that REAL human hands put it together.
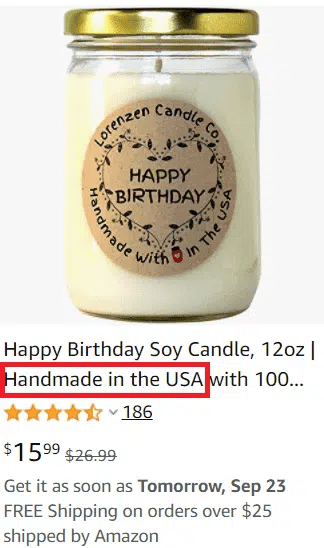
In some cases, the origin of the product can also add a lot of authenticity.
For example, a “Made in Turkey” bath towel has a higher perceived value than a regular bath towel that you find at Walmart.
Higher perceived value = You can charge more for it
- The Twist Method
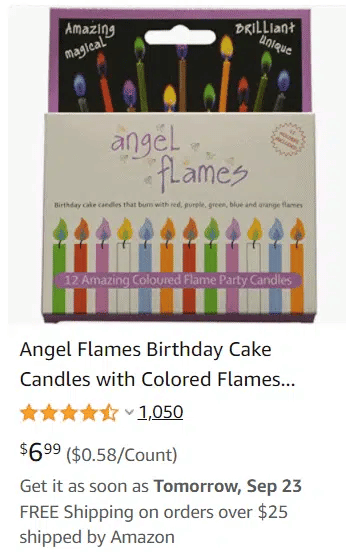
In this method, you are taking a classic everyday product and giving it a twist.
For example, this company sells party candles with colored flames instead of the typical ones, which made them super successful.
PRO TIP: Differentiation should be on top of your priority in the product research phase.
2- Focus On Profit Not Sales
It is better to sell 20 products per day at 30$ a pop
Vs
Selling 30 products per day at 15$
At the end of the day what matters is the total NET $$$ you put in your pocket.
Not the number of sales you made.
Not the amount of sales you made.
Not the dopamine rush you get every time you get a sale.
It is not always about lowering the price.
FAQ
Is Amazon Listing Optimization Worth It?
Yes. Without optimizing your listing, you can never rank on the keywords you’re targeting.
How Can I Improve my Local Listing?
You should improve the listing in terms of copywriting and structure as well as keyword optimization based on keyword research. Follow this guide to learn how to improve your product listing.
Should You Repeat Keywords on Amazon?
In gerenal, no. You can insert a keyword once and it will be indexed on Amazon. However, you should try to include different phrases in phrase form to maximize indexability for those phrases.
Now, it’s your Turn and I’d Love to Hear from you:
Whew! I hope you enjoyed this Definitive Guide on Amazon Listing Optimization strategy.
Which among the Amazon SEO strategies, tips, and hacks that we’ve offered are you going to try first to help your product listings to climb the search ranking?
What method are you going to use to research keywords that you will use for your Amazon optimization? Maybe you have another free tool in mind to use with product searches?
How will you evaluate search ranking factors to get your Amazon listings to the top of Amazon’s search engine results, gain more sales, and raise your conversion rates?
Are you hell bent on winning the coveted Buy Box and generate sales?
If you need even more information than this ultimate Amazon Listing Optimization Guide has already given you, check out the OJ Digital Solutions Amazon for Sellers resources — we’ve got you covered for all things Amazon!





One Response
Thanks for sharing your skills and techniques. Thank you for your suggestions!