Everybody needs a little time away, even Amazon sellers.
Some sellers, like fed-up lovers, want a permanent breakup.
However, I know as an e-commerce veteran that permanently closing shop may not always be the best decision.
That’s why I can also give you tips on temporarily taking time off from Amazon in case you don’t want to burn bridges and in case you don’t want to sell your business to Amazon aggregators.
If you’re one of these discontented sellers who want to know how to close your Amazon seller account, I will be able to help you with that.
In this article, I will explain the following:
- Steps to follow in closing your selling account on Amazon
- What to do before closing your account
- Alternatives to shutting down your account
So, let’s get started!
Alternate Options Before Choosing to Cancel Amazon Seller Account
Tired of either the selling on Amazon business or Amazon’s monthly fees, you’re probably itching to close your account right now.
But given that Amazon has attracted the most online visitors worldwide, even during the economically-difficult COVID pandemic, perhaps it’s good to think twice before shutting down your Amazon store.
Also, if you closed your Amazon seller account, it would be impossible to reactivate or reinstate it.
Once you cancel your account, you will lose access to all your past inventory information and transactions, and you won’t be able to communicate with buyers anymore.
Some of the alternative options you could consider before you cancel your Amazon seller account include the following:
- Going on Vacation Mode
- Downgrading to a less expensive seller account
- Removing particular product listings
Let’s explore each option one by one.
Vacation Mode
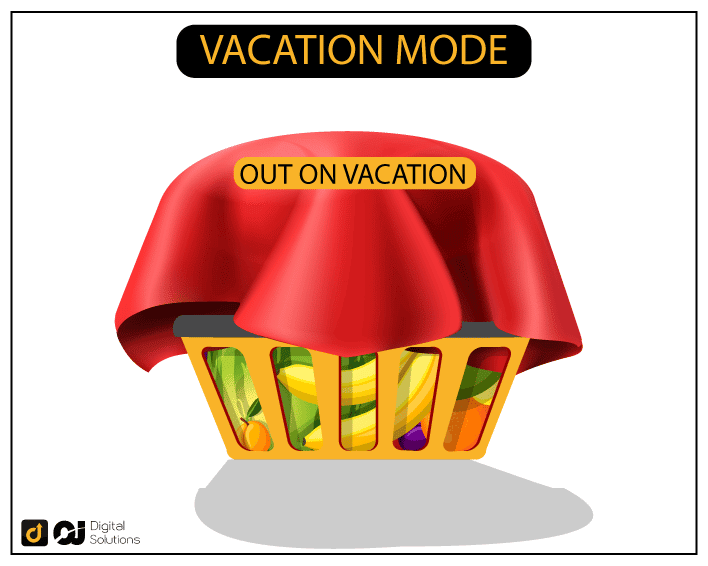
Amazon seller accounts set on Vacation Mode have invisible product listings.
So even if you still have items for sale in your inventory, buyers won’t be able to see your merchandise. Vacation Mode is like Amazon pressing the “pause button” on your business.
That’s an excellent temporary solution if you’re feeling the blues due to business burnout.
But before you choose to go on Vacation Mode, you have to do the following first to avoid negative feedback from your customers when you get back to business:
- Accomplish pending orders: Before setting your product listings to inactive, ensure all the orders in queue are fulfilled and shipped smoothly and properly. Pending orders remain so even if you change your listing status.
- Change your product listings status in advance: A good rule of thumb is to set your product listing status to inactive around 2 days before your vacation. This is to avoid any last-minute orders you wouldn’t be able to fulfill if you deactivated your listing too late.
- Set an automatic response: Email providers often have an auto-reply setting. Setting this up for the email address in your seller account will ensure your customers get at least an automated response in case they send questions. Your automated replies should let your customers know how long you won’t be taking orders.
Now that you know what to do before going on vacation, here are the steps to activate Vacation Mode for your listings.
1 – Log into your Amazon Seller Central account
2 – Hover your cursor over the Settings gear icon located at the top-right corner of the screen

3 – Click Account Info from the drop-down menu

4 – Try to find the Listing Status section on the Seller Account info page. Click the Going on a vacation? Link in the top right corner
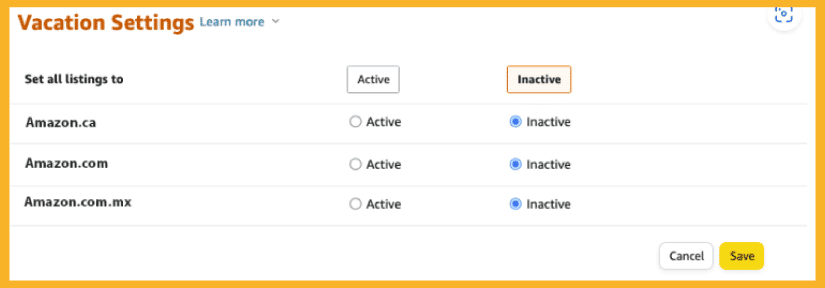
5 – You will be sent to the Vacation Settings page and see all the Amazon marketplaces (regions in the world) you’re selling in. Click the Inactive button for the Amazon marketplace where you want your listings to become invisible.
6 – Once you’re done setting listings to Inactive, click the Save button. Take note that 1 hour needs to pass from clicking Save before your listings are removed from Amazon’s search results.
A little warning though. Despite being on Vacation Mode, you still have to do the following:
- Deal with return requests and reply to customer messages within 24 hours (you can use the Amazon Seller app for Android and iOS smartphone operating systems to deal with these types of transactions easily)
- Pay for monthly subscription fees, particularly if you have a Professional selling plan
Now that you know everything about Vacation Mode, it’s time to check out another option that does not involve closing your seller account.
Downgrading Your Seller Account

Sometimes, it’s the monthly subscription fee as an Amazon seller that hurts.
Believe it or not, there’s a way to remove that pain without closing your seller account.
If you have a Professional Selling account, all you need to do is follow these steps to downgrade your account to the free Individual Seller arrangement:
1 – Log into your Amazon Seller Central page.
2 – Proceed to the Account Info page.

3 – Go to the Settings tab in the top-right corner. Then click Account Info from the drop-down menu.
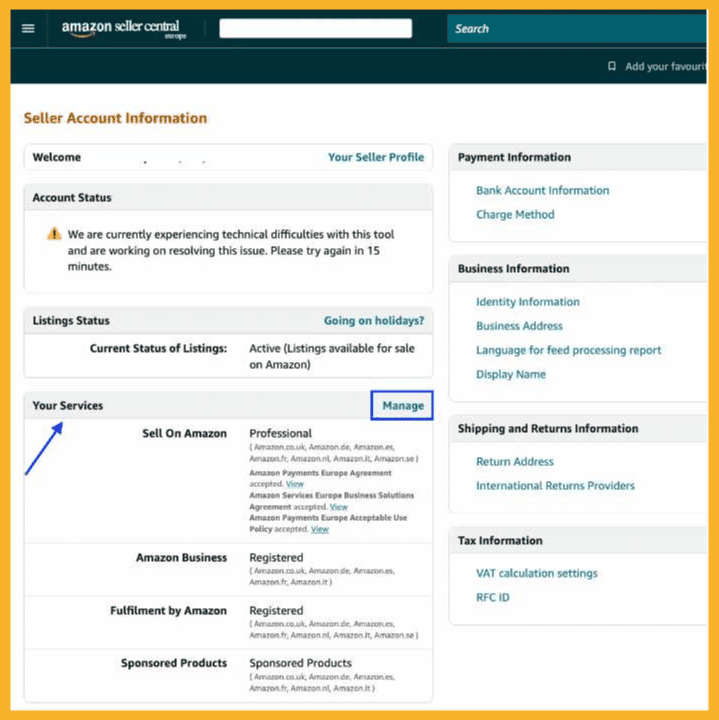
4 – On the Seller Account Information, locate and click the Manage link in the Your Services section.
5 – On the My Services page, find the Sell on Amazon row and click the Downgrade link.

6 – Click the Proceed button.
Deleting Particular Product Listings

Are particular products in your inventory not getting the sales your expected?
There are many reasons for this problem, among which are poor listing optimization, bad reviews or low product demand.
Why “close the entire store” when you can just delete the underperforming listings?
To do so, you only have to follow these simple steps:
1 – Open the Inventory tab. Then select Manage Inventory.
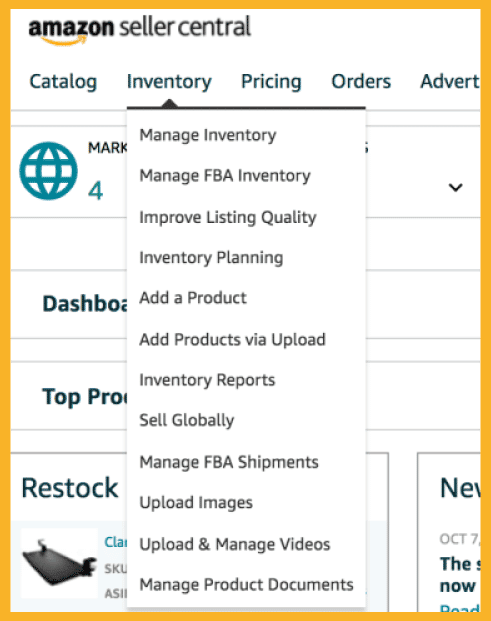
2 – Locate the stock-keeping unit (SKU) that you want to be removed and choose the Edit drop-down menu on the far-right side.
3 – Select Delete Product and Listing
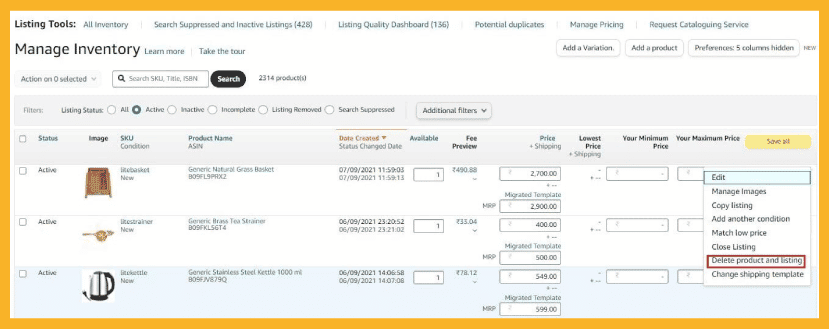
4 – If you want to remove more than one listing, click the box to the left of the listings you want to delete. Then select Delete product and listing from the Action on the selected drop-down menu above the list.
5 – Click OK to delete.
Steps To Take Before Closing Your Seller Account
If you’re a Fulfillment by Merchant (FBM) Amazon seller, the following steps are absolutely necessary before deleting or closing your account):
- Accomplish any pending orders
- Wait 90 days after your last sale to make sure you honor the A-to-z Guarantee claims period.
- Ensure your account has zero balance
- Resolve all customer transactions, including things like refund processing, etc.
- Make sure your bank account information is valid so you can receive a final payment.
- Check your Performance Notifications to ensure that all the reasons for your account’s suspension have been resolved and your account is restored
- If you are enrolled in U.S. tax calculation services, view the Downgrade / Upgrade and Tax Calculation Service page for important information.
Now, if you’re a Fulfillment by Amazon (FBA) seller, unlike the above steps, you must submit a request to either return or dispose of all inventory before following the seven steps above.
How To Delete Amazon Seller Account
Once you have performed the necessary preliminary steps, you can proceed to deleting or closing your account by doing the following:
- Make sure you are logged in to your Amazon Seller Central account
- Go to Settings, then select Account Info
- Click Close Account
- Fill out the form and submit your closure or deletion request

After you process the deletion of your Amazon account as a seller, you will receive an email that notifies you that Amazon has received your request.
In case the platform can’t process your closure request for some reason, don’t worry.
Amazon’s seller support team will send you an email so you know how to remove the roadblocks when closing or deleting your account.
What Will Happen If I Close My Account?
Now when your seller account on Amazon has been closed, the following will take into effect:
- Your product listings, including all related information and photos, will be totally and irreversibly deleted.
- You will no longer be able to access your outstanding balance, view your order history, process returns, issue refunds, respond to A-to-z Guarantee claims, or contact your buyers.
- If you closed a North America Unified Account, all of your other eligible accounts would be closed or deleted at the same time. For example, if you have a U.S. account and you close it, your Canada and Mexico accounts will also be shut down.
- If you terminate an Amazon Europe Marketplaces Account, your account will be closed across all European marketplaces.
- Your Amazon gift cards will no longer be accessible.
FAQ – Frequently Asked Questions
Can I Delete My Amazon Account And Make A New One With The Same Email Address?
In opening a new Amazon seller account, it’s not recommended you use the same email address which you used in your recently closed account. Many sellers encountered problems opening a new account when they used their old email address.
Does Amazon Close Inactive Seller Accounts?
Amazon defines inactive accounts as those that have not sold any products for 90 days. In case you weren’t able to sell for that time, don’t worry. In many cases, Amazon simply suspends inactive accounts but does not totally close them.
Suspended accounts are not the same as closed accounts. You can still find a way out of account suspensions by sending an appeal to Amazon.
How Long Does It Take To Close Amazon Seller Account?
To deactivate Amazon seller account, the platform takes 90 days from your last sale. This means that if your last sales transaction is dated August 3, 2022, your account will be closed by November 2, 2022.
What to Do Next?
The next time you feel tired of selling on Amazon, you should think twice and read the other options in this article to ensure you can take a break without closing your seller account.
However, when you feel like your relationship with Amazon is not working well, you can also look back to this guide so you’ll know how to close your Amazon seller account.

