A list of products (or product page) is a critical component of a successful Shopify store.
Do you want to know how to add products to Shopify? You’ve come to the right place.
I’ll walk you through the process of adding products to Shopify so you can start generating sales online.
Let’s start.
What Is Shopify?

Shopify is a popular ecommerce platform that allows users to build an online store and launch their business.
As a hosted platform, Shopify manages the platform’s complex source code. You don’t need to learn technical skills to start a business.
Shopify even offers tutorials on how to utilize the ecommerce platform for beginners. Users can add their available products to Shopify during the 14-day free trial to test the system.
How To Add Products To Shopify Store
Here’s how to add products to Shopify.
Log Into Your Shopify Account.
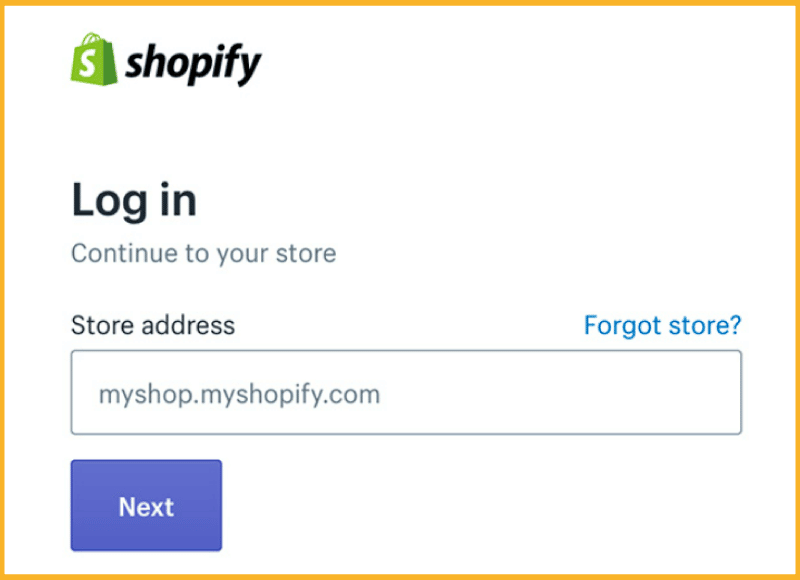
You must first log into your account backend to set up a product page on Shopify. To do this, you must have your login details on hand.
Select Log in on the Shopify website and enter your store’s domain address, email address, and password.
The most frequent issue people encounter is forgetting their Shopify log-in information. Don’t worry. Shopify will use the registered email address to send you the Shopify verification code.
Select Remember me to gain quick access to your account in the future.
Avoid this option if you’re using a shared device. You can also write down your Shopify passwords to avoid this time-consuming process.
Click Add Your Products.
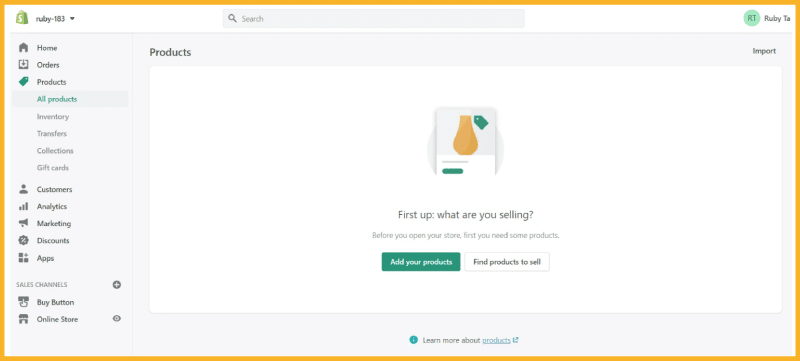
You will arrive at the admin-only Shopify dashboard after entering your account information. Here, you’ll find some of Shopify’s most crucial features.
On your Shopify account, search for the Products tab under the Search bar. You can choose to add a product or import products by clicking this option.
Click the Add your products button directly on the dashboard to add products to Shopify.
Select Find products to sell if you are still unsure what to sell on Shopify.
Add Product Details.
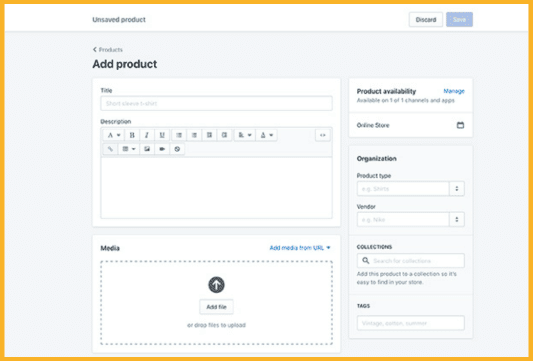
This step is the most crucial. Start filling out your product details screen with information.
Here are essential product details to include on your products page.
- Product title
- Product description
- Product availability (or product status)
- Product options (variants)
- Vendor
Product Title
The title should be concise and memorable to make it easier for customers to remember the product name.
Since you will place the details in the Description section, the product title can include some information about the item.
Be consistent with the names you give the available products. If you mention the color in one product title, you should mention it in others.
Description
Start writing compelling product descriptions by covering the logical and emotional reasons shoppers should add the products to their carts.
Understand your target market and describe how your product can benefit them. Use the rich text editor in this part to draw attention to the critical details and wow your consumers.
Product Options
When you check the box saying, “This product has options, like size or color,” Shopify will display the blanks below.
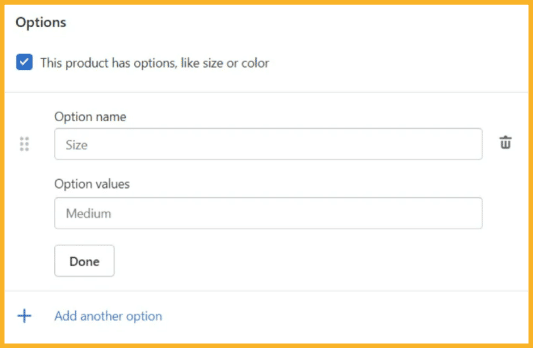
For each selected option, you can provide Color, Size, Material, and Size in the Option Name and Add values.
These options make it easier to manage your Shopify inventory.
Vendor
Include your brand name in this section if you sell products you make yourself.
Add Price, Inventory, SKU, and Additional Information.
After finishing the central portion of your product description, you must fill in the remaining information.
You may enter information about your product under Shopify’s Inventory and Variants area, including
- Price
- Inventory
- SKU (Stock Keeping Unit)
- Shipping methods
- Weight
Price

Customers will want to know the price range for each product in your online store. Being clear about the cost of each of your products is crucial.
You don’t need to provide a currency symbol because the tool will already know what currency your ecommerce shop accepts from your Shopify General settings.
Carefully consider your pricing. You want to satisfy customers with reasonable pricing while preventing losses from selling at overtly low prices.
Inventory
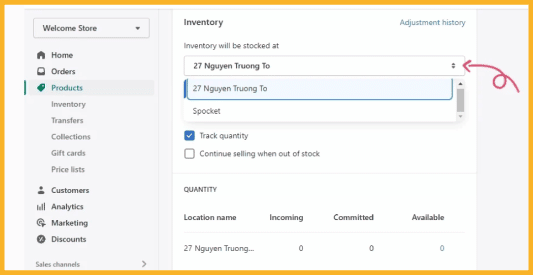
The Inventory section will appear as you scroll down the page.
If you handle your own inventory, enter your physical address in the box with “Inventory will be stocked at” at the top.
If a third-party app handles your inventory, you can select the second option (in the screenshot, an app named Spocket)
SKU (Stock Keeping Unit)
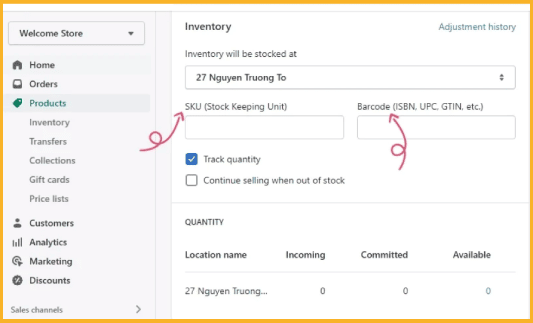
The Stock Keeping Unit or SKU is a unique value for the item. Add your inventory quantity in the Shopify products section’s SKU box.
SKUs make it easier to manage your inventory and effectively complete orders. It effectively serves as a unique identification code for each item in your store.
You can get the number from the supplier or the manufacturer’s website. You can also create a format that makes perfect sense if you’re unfamiliar with SKUs.
The Barcode option is also visible to the right. If you’re a beginner solely selling online, you don’t need to worry about this section.
The Shopify admin will monitor the quantity of this item if you check the Track quantity option. Inventory tracking is crucial if you have a limited stock to ensure you’re not selling an out-of-stock product.
If you’re sure you can meet demand and will promptly resupply your items, you can also select the Continue selling when out of stock option.
Fill in the Quantity field with the total number of available units. Your inventory structure will change slightly from our example if you operate multiple locations for your business.
Shipping Methods

If you’re selling a physical item that needs to be delivered, check the box beside “This is a physical product” in the Shipping section.
Ignore this option if you sell digital goods or services that don’t require shipping.
Weight

Although the weight of your goods may not appear necessary, it significantly impacts your order fulfillment strategy’s freight and shipping costs.
To ensure you accurately charge buyers for shipping, you must include the correct product weight.
Several measurements are available in the drop-down menu on the right, including pounds, ounces, kilograms, and grams. Pick the one that works best for your product.
It’s better to overestimate weight here than underestimate it if you need clarification on the actual amount. The default weight for your products will be 0.1 lb if you don’t enter a weight number.
Customs Information
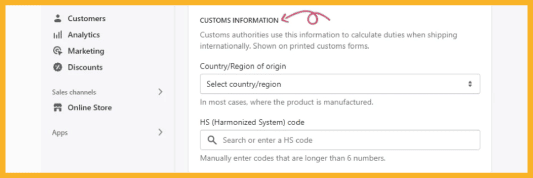
The Customs Information is exclusively applicable to international sales. You need to enter the country or region of origin to export these goods abroad.
The HS (Harmonized System) code is also a requirement. These codes enable customs officials to choose the appropriate tariff to impose on the item. By performing a keyword search in the HS code field, you can discover the HS code for your products.
If you want to profit from Shopify, you have to cope with delivery charges. You decide whether to include these fees in your customers’ bills or pay for shipping yourself.
Instead of including these additional costs during the checkout process, I advise offering your consumers free shipping by factoring the delivery cost into your overall price.
Add Product Images.
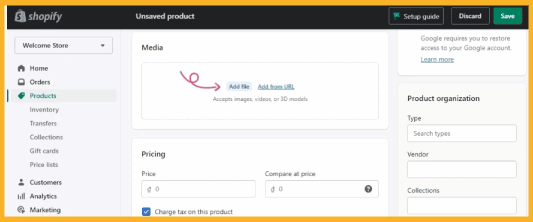
Upload images that will give your buyers much-needed context for what they’re buying.
Click Add file to add your product’s photos, videos, or 3D models. You can add them by dragging and dropping files, uploading them from your device, or entering a URL.
Store owners should include relevant visuals here to benefit customers.
Product Images
The recommended file formats for Shopify product images are PNG, JPEG, and GIF. For Shopify to accept them, product photos must be under 20 MB.
Videos
A video file can only be 10 minutes long and 1 GB. On Shopify, 4K is the best resolution for videos.
3D Models
GLB or USDZ should be the format used for your 3D models. Shopify will instantly optimize your 3D model file to maintain the quality but lower the size if the file is larger than 15 MB.
Use consistent formatting when naming your photos. Always use a dash to separate each word. Doing so makes it easier to increase your rankings on search engines.
Include many pictures of your product on each page, preferably from different angles. Upload images of product variants, too, if applicable.
Always verify you have the right to use the pictures you upload, and ensure all images are crisp and clear.
Add Tags and Collection Information.
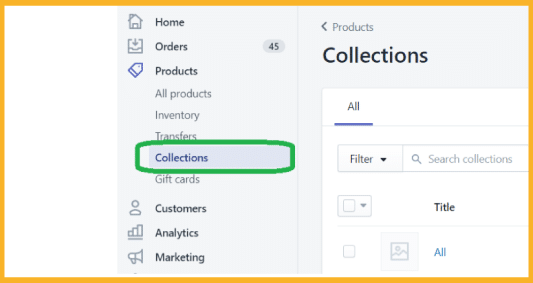
The next step is to add your products to specified collections or sections of your website. A Collection is similar to a category on Shopify.
Your product page can be added to any category using the Add to Collections option. For example, this might involve adding some boots to the “footwear collection.”
You can add tags to your product to make it simpler for buyers to find and search for products. You can also use these searchable keywords to create automated collections on your eCommerce store.
Click on the product name you wish to change in your Shopify admin panel, then select the Organization tab.
Here, you can add tags for your products. To separate multiple words, use commas. Click Save to complete the process.
Shopify store owners can also use tags to build automatic collections. Go to the Collections section on your admin page and write a description or title for your collection.
Edit Your Search Engine Listing.
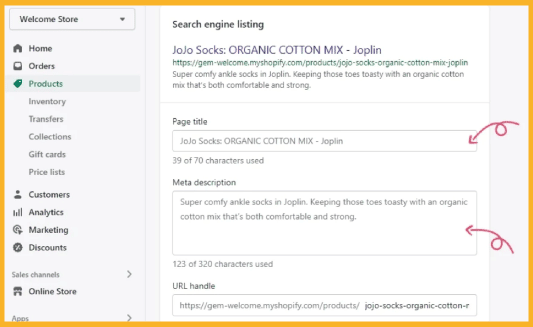
Shopify automatically generates page titles and meta descriptions to help optimize your online visibility.
This automatically-created information comes from the data you entered on the Product Details tab.
To maximize your SEO, you’ll frequently need to modify the Meta Description and Page Title information independently.
Your page title and meta description must include valuable keywords relevant to your products. Go to the Search engine listing preview after clicking on the Product Details page to update your information.
Enter a keyword-rich description in the page title section after clicking Edit website SEO. This description will appear in Google’s search engine results. Your title can be up to 55 characters.
For your search engine listing, you can also provide a description. Ensure you include essential keywords so that customers may also find you here. The character limit for meta descriptions is 320.
Edit your website’s URL under the URL and handle tab. If your URL contains random digits, replacing them with terms appropriate to the product page can be worthwhile.
Remember, URLs can’t include spaces.
Click Save.
Publish Your Product Page.

Quickly review the information on your product pages before clicking the Save product button in the bottom right corner of the screen.
After saving your changes, navigate to the top of the page to check how your product page appears. To ensure everything is according to your expectations, click the View on your website option.
You can change your product pages if you need any corrections by returning to each product page. Be careful when using things like tags and collections since even though you may edit your product information at any time, this could affect how the products group in your reports.
Go to your Shopify admin page and click on Products to update a page. Choose the name of the product you wish to edit. Click Save after making the necessary changes.
How To Duplicate a Product

Duplicating products currently on your list will save you a ton of time, whether adding items from a dropshipping source (such as using Oberlo) or selling through multiple sales channels.
When you duplicate an item, you can include choices and replicate one or more accessible details, including pictures, SKUs, inventory status, and barcodes.
Try adding a variant to give one of your items more choices. The identical product is default hidden on all your active sales channels and applications.
You will change the product availability after you publish it. You can also make the duplicate accessible using the same channels.
Here’s how to make a duplicate product.
- From your Shopify admin, navigate to Products, then All Products.
- Click the product name you wish to replicate in the Shopify app.
- Check in the duplicate box.
- Enter a name unique to the existing product.
- Choose Duplicate once again.
- Change the product information.
- You can also change the product’s accessibility and make it available through the same channels as the original.
Remember that a product variant is not the same as a duplicate product.
The Bottom Line
I hope my guide made it easier to understand how to add products to your Shopify storefront.
An excellent product page with detailed descriptions and high-quality product images (or videos) is essential to succeeding as a Shopify entrepreneur.
However, a solid product page isn’t the only thing you need. To earn a profit, you must know how to sell on Shopify.

