Knowing how to add video to Amazon listings is an excellent way for brand owners to boost sales and conversions.
Videos are especially helpful in educating your prospects about your products’ features and benefits. It’s also the best way to show your product in action.
Even better is that it’s incredibly easy to do. With these simple instructions, you can improve the visibility of your products and boost your business.
Whether you’re just getting started with videos or looking to improve your current strategy, this guide has you covered.
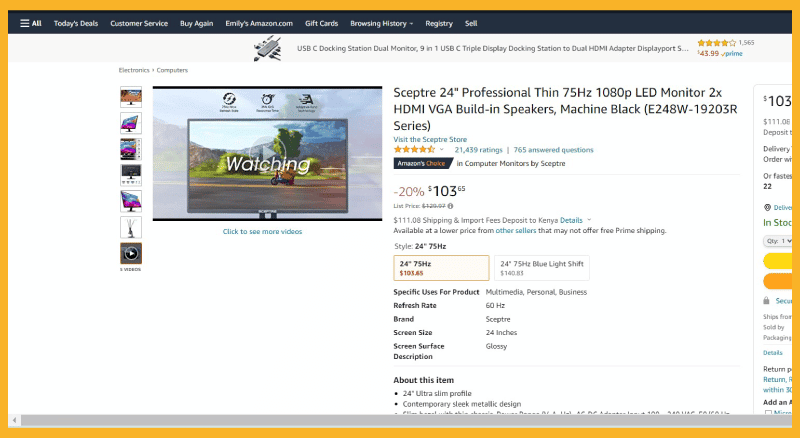
Source: Amazon.com
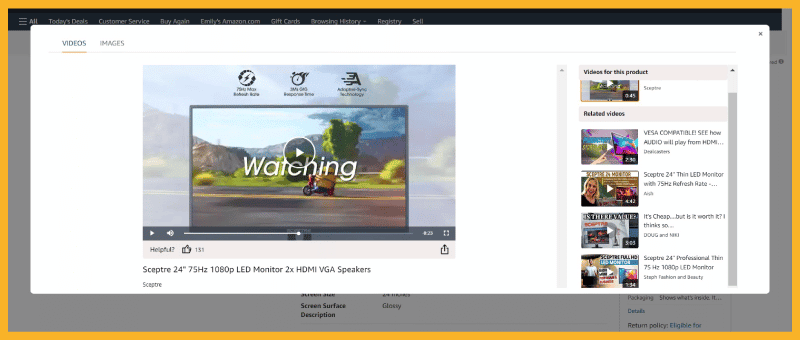
Source: Amazon.com
Amazon Listing Video Requirements
Amazon has a few guidelines to adding video files:
- The video must have a minimum resolution of 1280 x 720 pixels and a 16:9 aspect ratio
- It should be captured with an RGB profile at a minimum bit rate of 1 Mbps
- The file must be in one of their supported formats: MP4, MOV, 3GP, AAC, AVI, FLV, or MPEG-2
- The audio should have a sample rate of at least 44 kHz and a bit rate of 128 kbps
- Although there are no restrictions on length, a video should ideally be not longer than two minutes
Types of Amazon Videos

There are four types of videos you can add to your Amazon product listing:
Product Highlights Video
A Product Highlights video is a short clip that showcases your product.
This is a great way to show off your product’s key features. It also helps customers understand what your product is.
Videos of this type should have a clear view of your product. You can also add some close-ups to display details on your product.
Shoot different angles to show off your product from different perspectives. You can also add a voice over to explain what customers are seeing.
Customer Experience Video
A Customer Experience video is a great way to show potential customers how your product is used in real life. This can be a short clip of someone using your product, or even a quick testimonial from a satisfied customer.
Videos like this are a great way to build trust with potential customers. They are also effective in showing that your product is of high quality and worth the investment.
To create a Customer Experience video, you can film a customer using your product or collect customer testimonials. Be sure to highlight your product’s best features and customers’ experience with it.
Explainer Video
An Explainer video is meant to educate potential customers about your product.
This type of video explains how your product works or answers common questions about your product. Customers who are unfamiliar with your product will find it extremely helpful.
Explainer videos also provide an opportunity to build trust with potential customers and prove why your product is the best solution for their needs.
When creating an Explainer video, be sure to focus on explaining your product in a clear and concise way.
Use simple language that everyone can understand, and avoid using industry jargon. They key is to be persuasive, so make sure your video leaves no room for doubts.
Comparison Video
Comparison videos show potential customers how your product stacks up against the competition.
They can be used to show how your product is different from the competition or how its features are superior.
When done correctly, Comparison videos can convince potential customers that your product is the best on the market.
When creating a Comparison video, be sure to focus on features that set your product apart from the competition.
Additionally, these videos are extremely helpful for buyers in a competitive market.
Benefits of Adding Videos on Amazon Listing

Increased Conversion Rates
Adding a video to your listing can increase conversion rates by a significant margin. It can be the push that you need to convince your customers that they need it.
A well-made video can be the difference between a customer buying your product or not.

Improved SEO
Product videos are indexed by search engines, and can help your listing rank higher in search results. The more people who see your listing, the better chances you have of making sales.

More Engagement
Customers are more likely to watch a video than read through a long product description, so a video can help keep potential customers on your listing longer. This increased engagement can lead to more sales.

It Helps You Stand Out From Competition
Not all sellers take the time to upload video files, which means that adding one can help your listing stand out.
This increased visibility can lead to more sales for your business. In a sea of text-based listings, a video can be the difference between a customer finding your listing or not.

Builds Trust
While a lot of products have well-written reviews, it’s hard to beat video reviews and testimonials from happy customers. After all, seeing is believing.
Customers who see how your product works or satisfied customers using your product are more likely to purchase your product and become loyal to your brand.
How to Upload a Video to Your Amazon Listing
Now that you know the benefits of uploading videos to your Amazon listings, I’ll explain how you can do that.
Adding a video to your listing requires only a few steps. Here’s how to upload videos to your listings:
Step 1: Go to the Inventory Tab
The first thing you need to do is go to the Inventory tab in your Amazon Seller Central account.
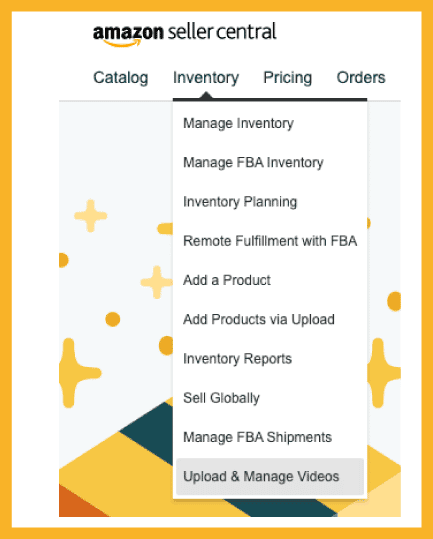
Source: Amazon.com
Step 2: Click on Upload & Manage Videos
Once you’re in the Inventory tab, click on Upload & Manage Videos.
Step 3: Upload the Video
You can either upload a video file from your computer or enter a URL for a video that is already hosted online.

Source: Amazon.com
Step 4: Write a Keyword-Optimized Title
Be sure to include keywords that are relevant to your product in the video title. This simple action will improve your listing’s SEO.
Potential customers will also be able to find your video more easily if it is properly titled and keyword-optimized.
Step 5: Add an Eye-Catching Thumbnail
The thumbnail is the image that customers will see when they are scrolling through listings. Be sure to choose an image that is high quality and accurately represents your video.
Step 6: Select the ASINs (Products) Linked to Your Video
After you’ve added a title and thumbnail image, you will need to select the ASINs you want your video to be associated with.
You can find your ASIN by visiting the product’s URL or by visiting the product detail page.
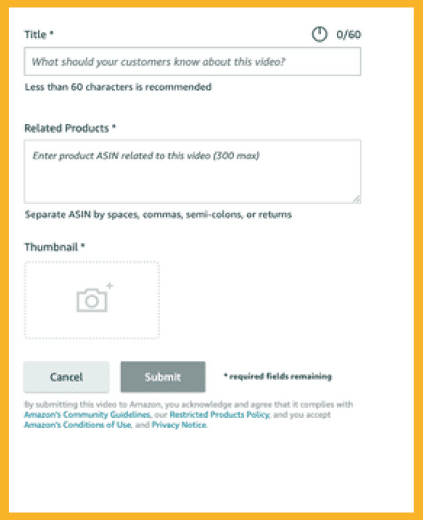
Source: Amazon.com
Step 7: Click Submit for Approval
After you’ve selected the ASINs that you want your product video to be associated with, click Submit for Approval.
Your product video will now be sent to Amazon for review. Once it has been approved, it will appear on your listing.
FAQ – Frequently Asked Questions
Can I Add Video Files to Amazon A+ Content?
Yes, you can add video files to Amazon A+ content.
This will be visible on the main image block of their product detail page. The Amazon Video Shorts section will also display uploaded videos.
When you upload videos to A+ enhanced brand content, it helps build trust with potential customers and helps you stand out from the competition.
How Many Videos Can You Have on an Amazon Listing?
You can have up to six videos on an Amazon listing. This includes videos that are added to the product image block, as well as the Amazon Video Shorts section. Adding more than one video can improve your chances of appearing in search results.
How Do I Add a Video to My Amazon Listing Without the Brand Registry?
You can still add a video to your listing even if you aren’t enrolled in Amazon Brand Registry. Initially, this wasn’t the case, but Amazon has since updated their policy.
The Bottom Line
Adding high-quality videos to your Amazon listings can help improve your SEO, engage potential customers, and build trust with your brand.
And with how simple it is to do, there’s no reason to pass up on it at all.
I hope this guide has helped you understand adding videos to Amazon listings. Just follow the steps outlined in this article and you’ll have a video on your listing in no time!
Be sure to check out our Amazon listing optimization guide as well to boost your chances even further.


